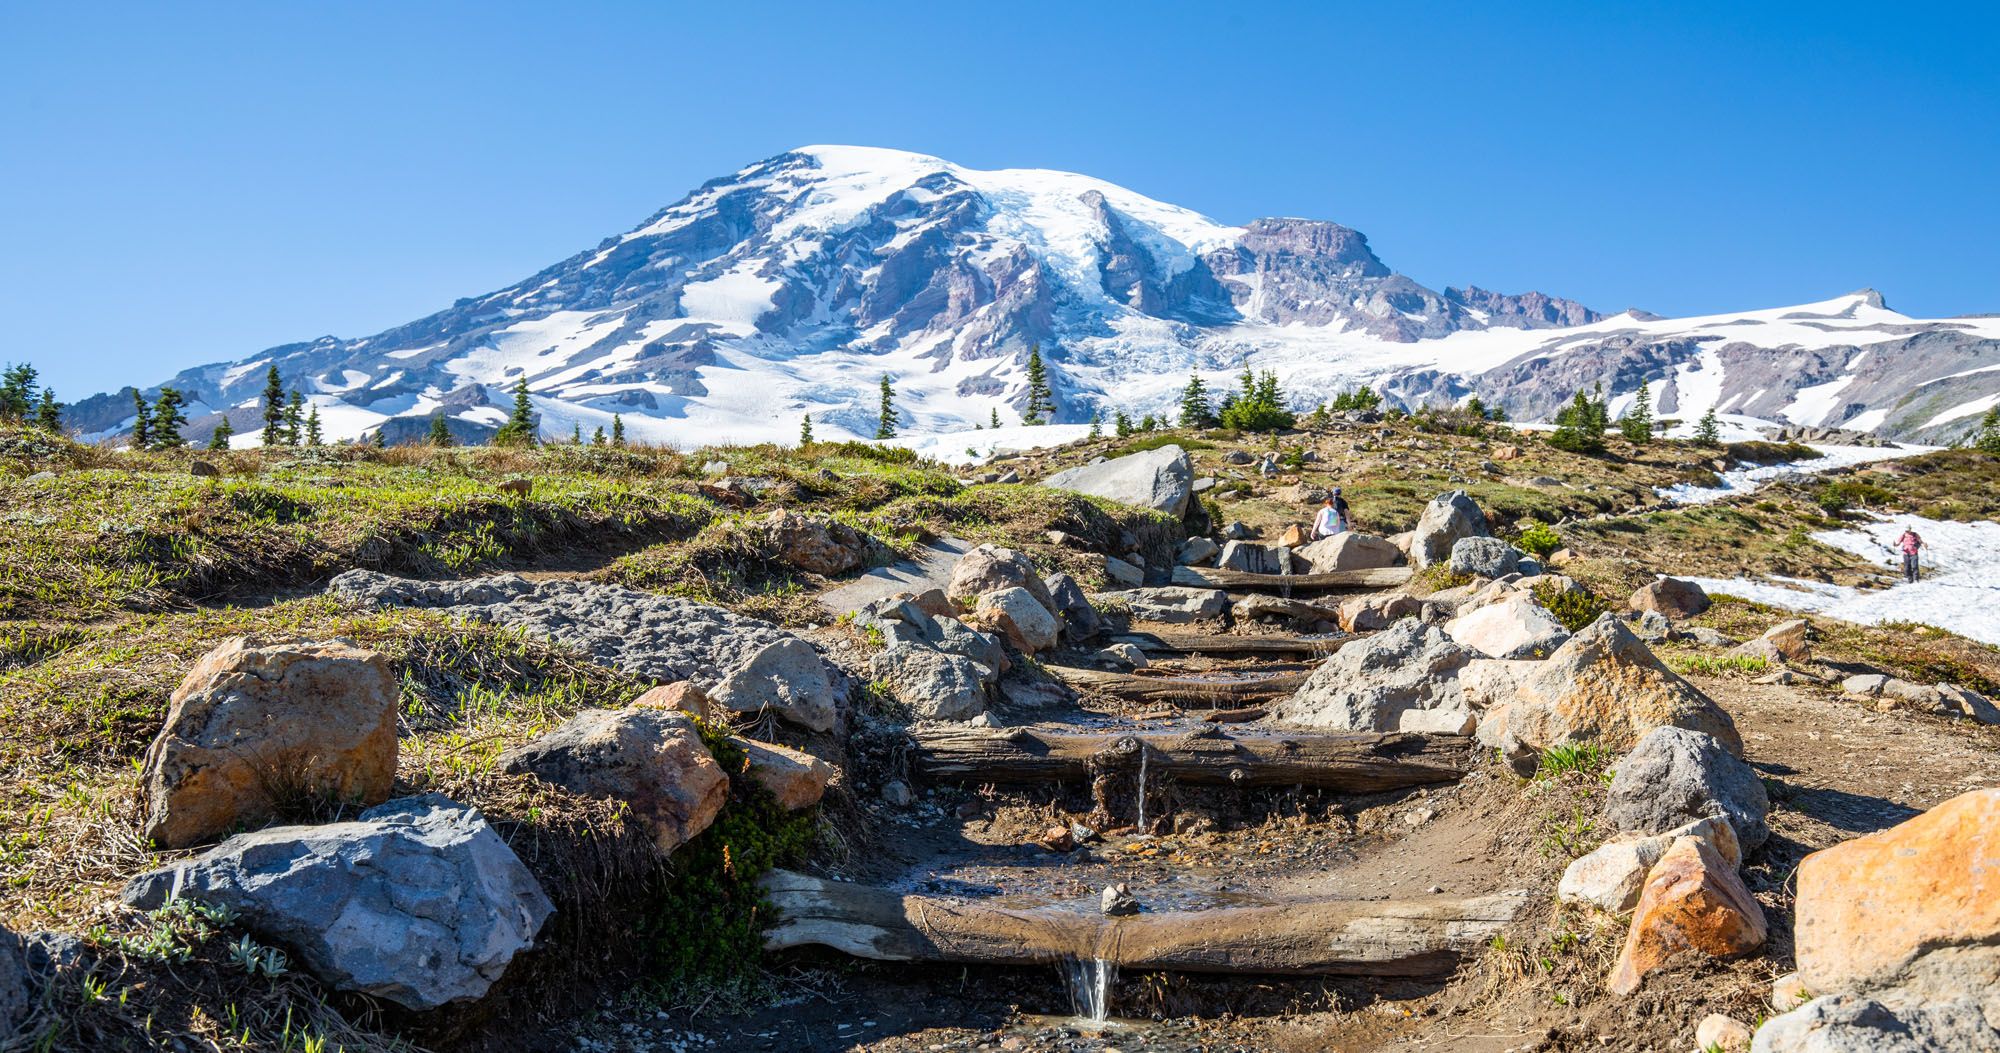
Mount Rainier is one of the most spectacular hiking destinations in the United States. From wildflower-covered alpine meadows to glacier viewpoints and fire lookout summits, the variety here is incredible.
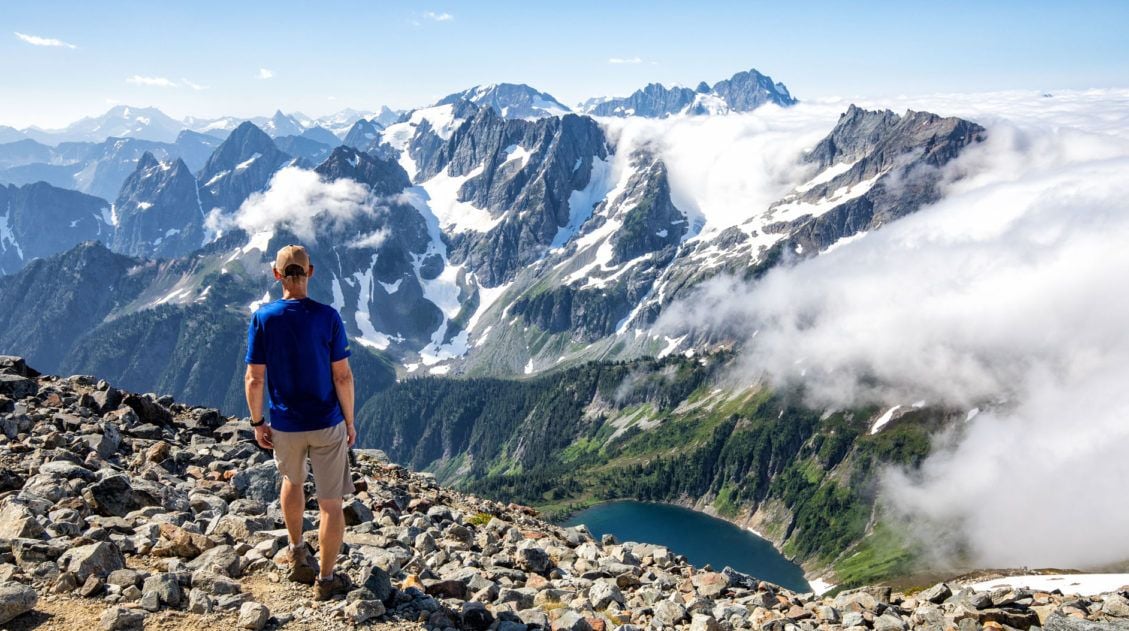
We’ve hiked in more than 50 U.S. national parks and on trails around the world, from Everest Base Camp in Nepal to the Dolomites, and Mount Rainier stands out for one reason: you get massive mountain views on almost every trail.
We’ve visited Mount Rainier twice. On our first trip, we built our entire trip around hiking, carefully choosing trails across Paradise, Sunrise, Ohanapecosh, and Carbon River to experience the full range of terrain, from short, family-friendly walks to long, high-alpine climbs.
On our second trip, we day tripped here from Seattle, hiking the stunning Fremont Lookout Trail with friends who were new to hiking. They were absolutely amazed by the incredible views from this hike.
This guide is designed specifically for first-time visitors who want to:
- Choose the right hikes for their fitness level
- Maximize views of Mount Rainier
- Avoid wasting time driving between park regions
- Understand which trails are worth the effort
If you are in the early planning stages, start with our Mount Rainier National Park Travel Guide and our Mount Rainier Itinerary for recommendations on how to plan your time.
GOOD TO KNOW IN 2026: Timed-entry permits are not required in 2026. The bridge into Carbon River/Mowich Lake is closed (no access for pedestrians, bicycles, or vehicles) but the area is open to backpackers.

Best Hikes in Mount Rainier
BEST OVERALL HIKE | Skyline Trail
BEST MODERATE HIKE | Mount Fremont Lookout
BEST EASY HIKE | Myrtle Falls
BEST WATERFALL HIKE | Silver Falls
BEST FOR VARIETY | Summerland to Panhandle Gap
BIGGEST CHALLENGE | Camp Muir
BEST MULTI-DAY TREK | Wonderland Trail
Please practice the seven principles of Leave No Trace: plan ahead, stay on the trail, pack out what you bring to the hiking trail, leave areas as you found them, minimize campfire impacts, be considerate of other hikers, and do not approach or feed wildlife.
How to Choose the Best Hike in Mount Rainier
If you’re short on time, this section will help you quickly narrow down which hikes to do in Mount Rainier National Park.
If You Want the Classic Mount Rainier Experience
- Skyline Trail to Panorama Point
- Mount Fremont Lookout
These offer the most dramatic, up-close views of the mountain.
If You Prefer Short & Easy Hikes
- Myrtle Falls
- Silver Falls Loop
- Sourdough Ridge to Frozen Lake
Minimal effort, big views.
If You’re Visiting During Wildflower Season
- Spray Park
- Naches Peak Loop
- Summerland
Late July through August is prime bloom season.
If You Want Fewer Crowds
- Tolmie Peak
- Spray Park
- Summerland to Panhandle Gap
These require more effort or driving, which keeps numbers lower.
If You Want a Big Challenge
- Camp Muir
- Wonderland Trail (section hike it or backpack the full loop)
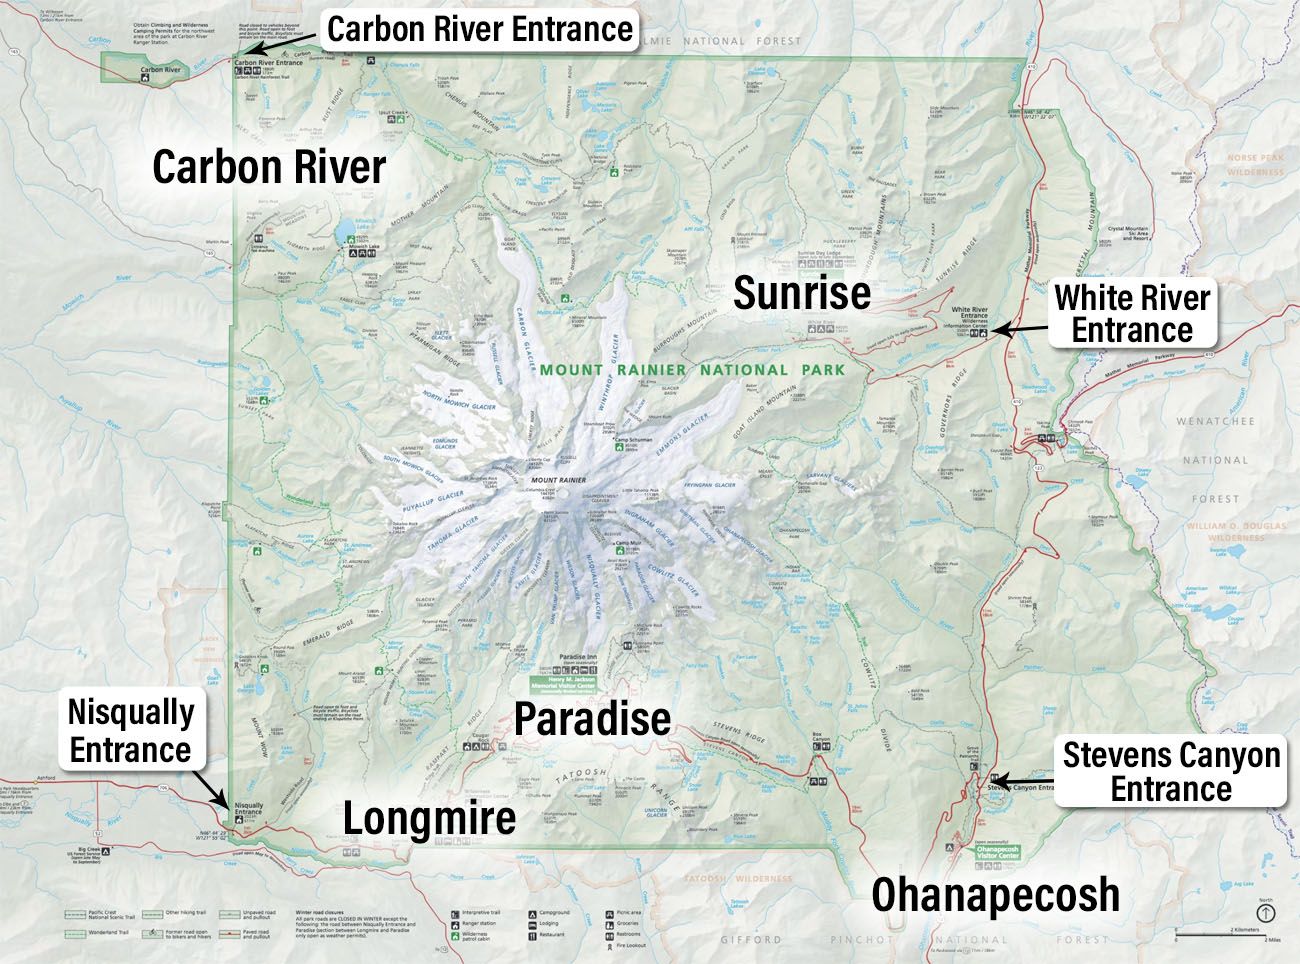
Geography 101: The Hiking Regions of Mount Rainier
Mount Rainier National Park has four main hiking regions:
- Paradise/Longmire (most iconic views, most crowded)
- Sunrise (higher elevation, incredible ridge hikes)
- Ohanapecosh (old growth forest and waterfalls)
- Carbon River (quieter, wildflower-filled meadows and fire lookouts); currently the bridge is closed to pedestrians, vehicles, and bicycles so the only way into this area is by backpacking
Below is a map of the park from the National Park Service. I labeled the main areas of the park where most visitors will spend their time.
Best Hikes in Mount Rainier National Park
We organized this list by region so you can plan your days efficiently and avoid unnecessary driving between sections of the park. Note: all distances in this post are round-trip.
First, here are the best hikes in Mount Rainier National Park on a map.
How to Use This Map: Click the icons on the map to get more information about each point of interest. To take this map with you, click the star next to the title of the map which adds it to your Google account. Next, within your Google Maps app, select ‘Saved’ and then select ‘Maps’. This map title will now appear in your list.
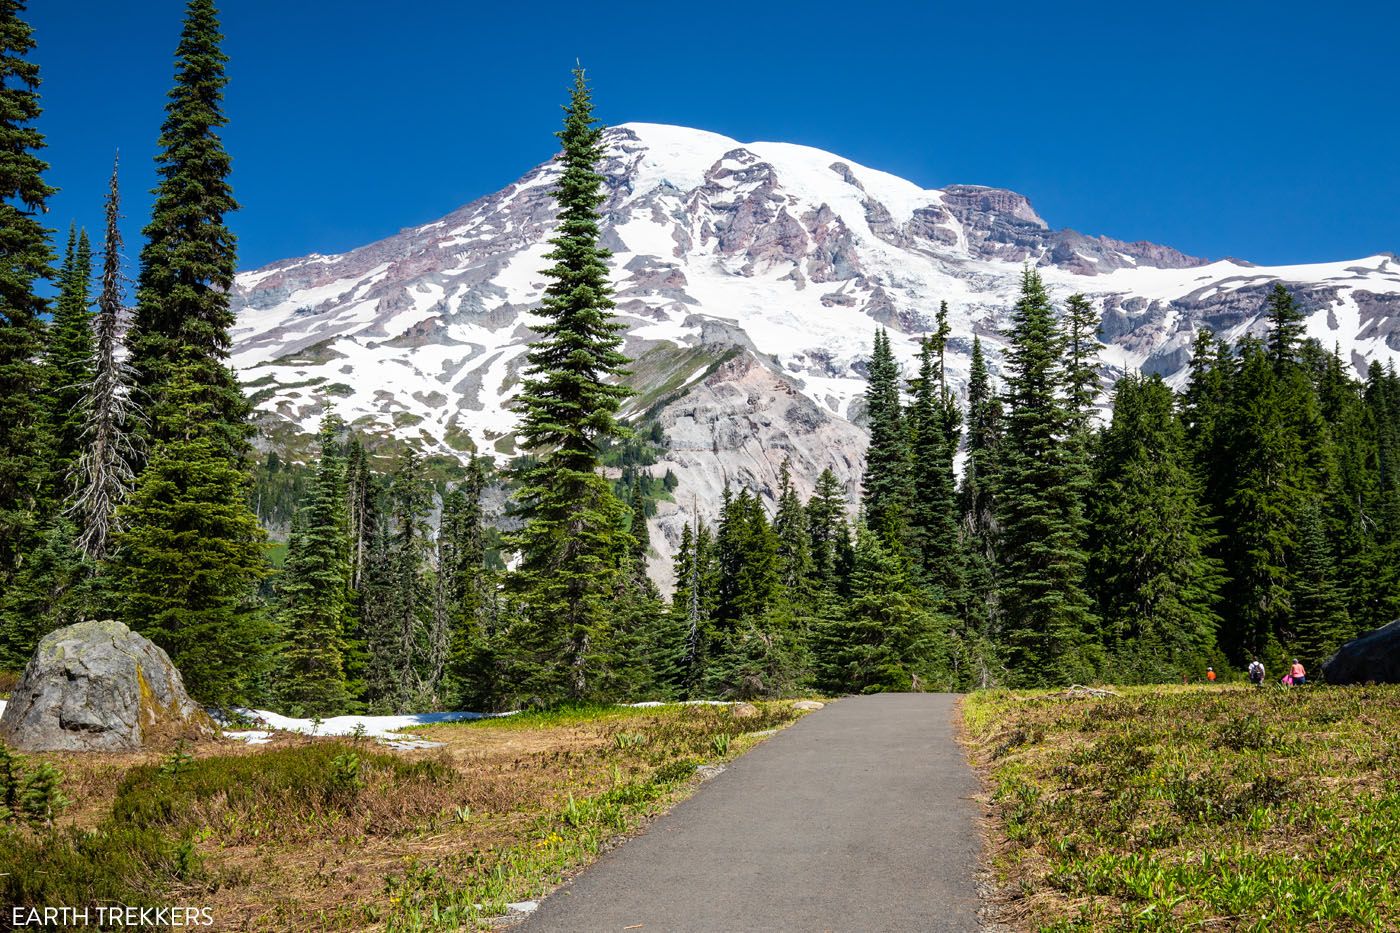
Hikes in the Paradise Area
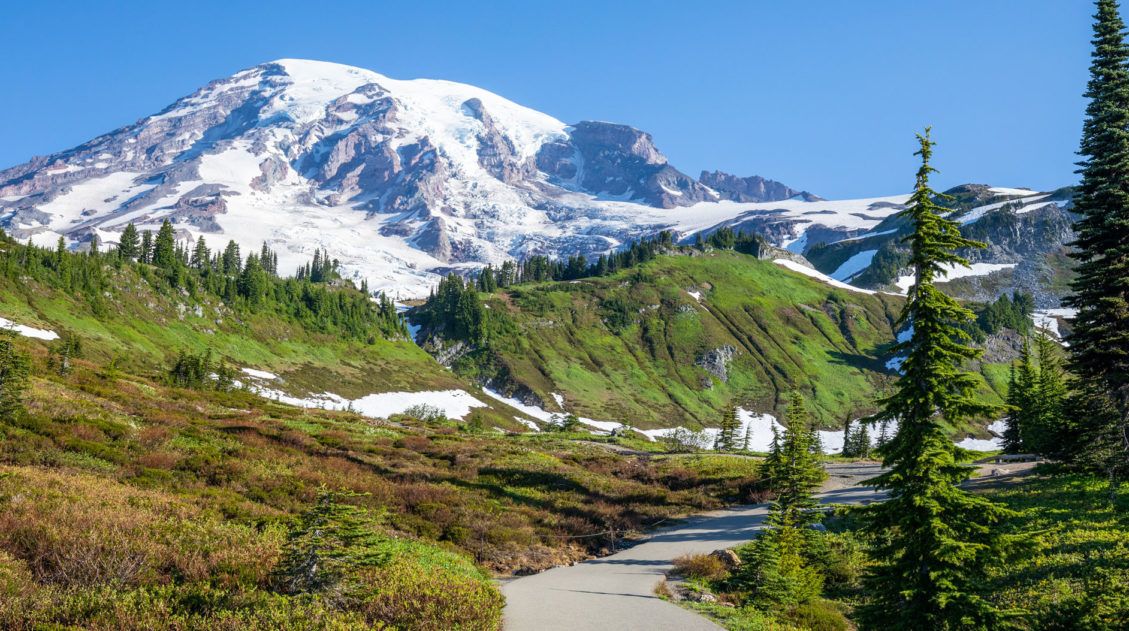
Paradise is located on the southern slopes of Mount Rainier and it is one of the most heavily visited areas of the park. Numerous hiking trails are found here, including the spectacular Skyline Trail, and nearby, you can also hike to numerous lakes and waterfalls.
Nisqually Vista: Amazing Views on Paved Trail
Distance: 1.2 mile loop
Difficulty: Easy
Total Ascent: 200 feet
Time: 45 minutes
Trailhead: Lower Paradise parking lot
Best for: First-time visitors who want a short, easy walk with glacier views
Why it’s worth it: One of the easiest ways to see Mount Rainier and the Nisqually Glacier up close
Skip it if: You’re looking for solitude or a longer alpine experience
Nisqually Vista is one of the easiest hikes in Mount Rainier National Park and a great introduction to the Paradise area. This mostly paved loop offers open views of Mount Rainier and a close look at the Nisqually Glacier, with minimal effort required.
There are a few short but slightly steep climbs, but overall this trail is manageable for most visitors, including families and those pushing a stroller. On a clear day, the glacier views are impressive for such a short walk.
If you are limited on time in Paradise or visiting with young kids, this is an excellent add-on before or after a bigger hike like the Skyline Trail.
Nisqually Vista Trail
Myrtle Falls: Best Easy Hike in Paradise
Distance: 1 mile
Difficulty: Easy
Total Ascent: 100 feet
Time: 30 minutes
Trailhead: Upper Paradise Parking Lot
Best for: First-time visitors who want an iconic Mount Rainier photo with minimal effort
Why it’s worth it: A postcard-perfect view of Mount Rainier framed by a waterfall
Skip it if: You want a longer hike or fewer crowds
If you are looking for one easy-to-do hike in the Paradise area, look no further.
Starting next to the Paradise Inn, you will walk the first part of the Skyline Trail. It is a paved path the entire way to Myrtle Falls, so this also makes a great hike for families with young kids and strollers.
Once you get to Edith Gorge, there are two viewpoints to visit. Take the short spur trail for a view of Myrtle Falls. It is a short but steep walk downhill to this viewpoint:
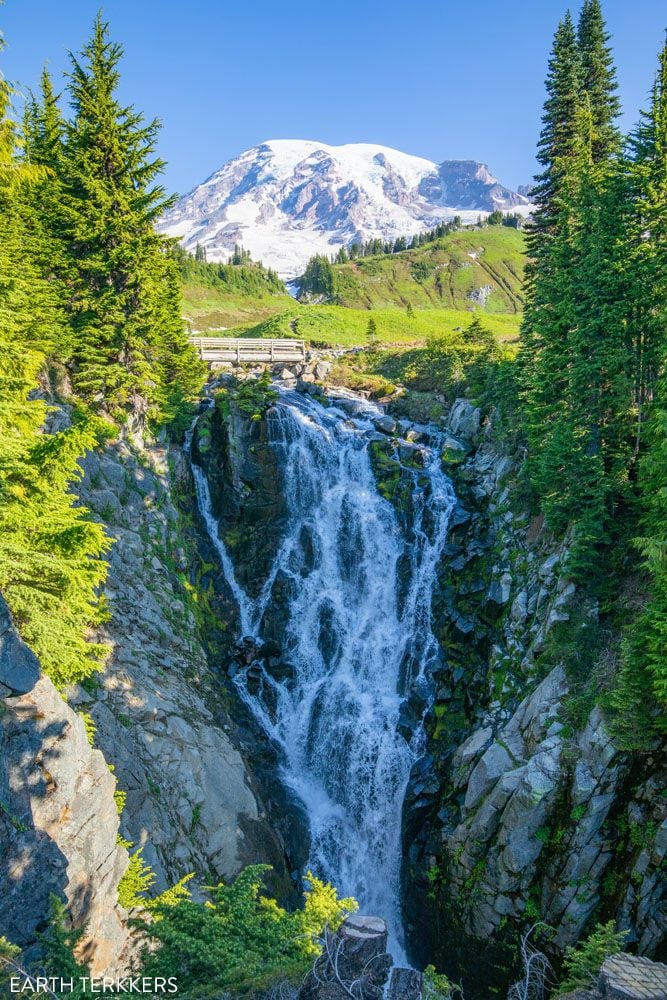
Once you are back on the Skyline Trail, turn right and walk about 100 feet. From here, you get a spectacular view of Mount Rainier with Edith Gorge.

PRO TRAVEL TIP: There is not a whole lot to see beyond this point. The only reason to keep going is if you plan to hike the entire Skyline Trail (mentioned next). Beyond Myrtle Falls, the trail drops down into a valley and you lose the great views of Mount Rainier.
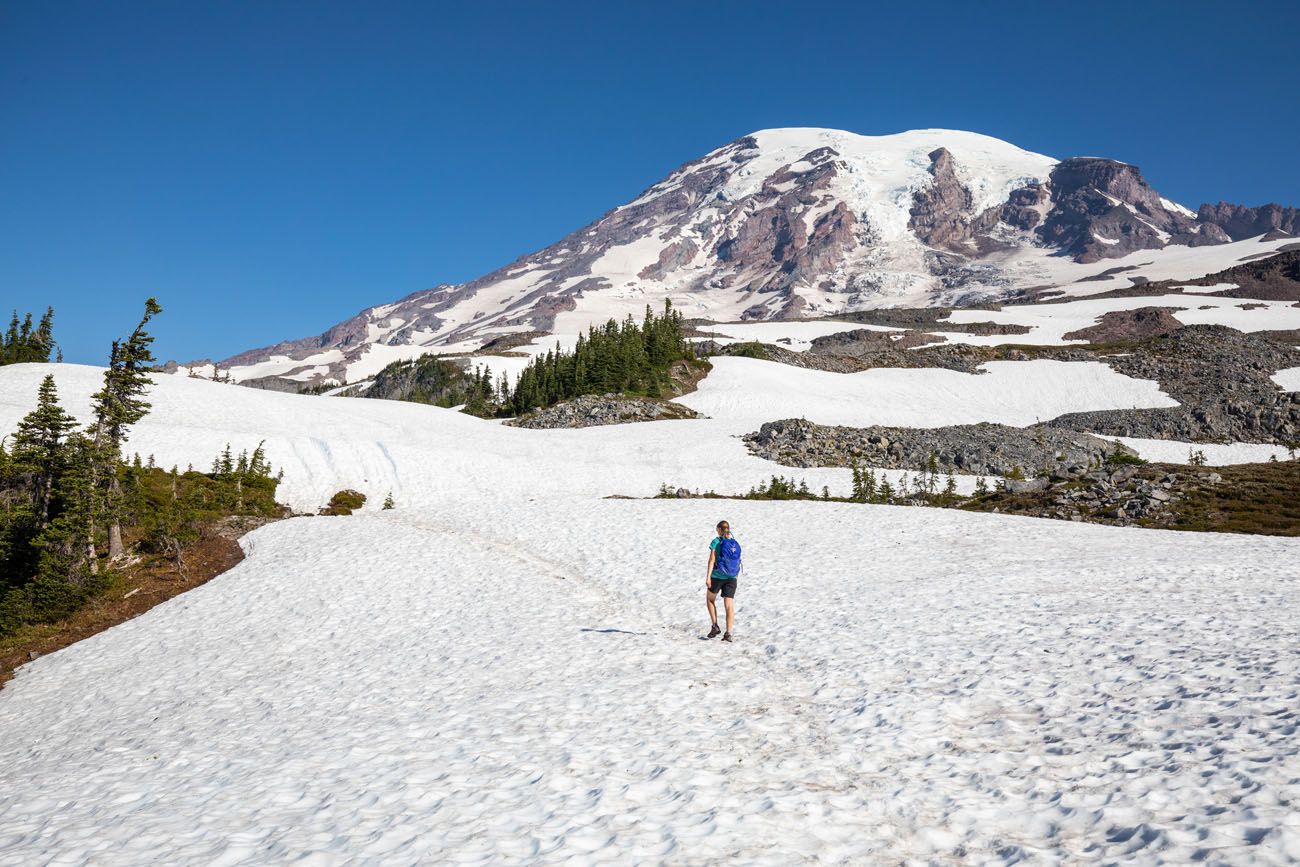
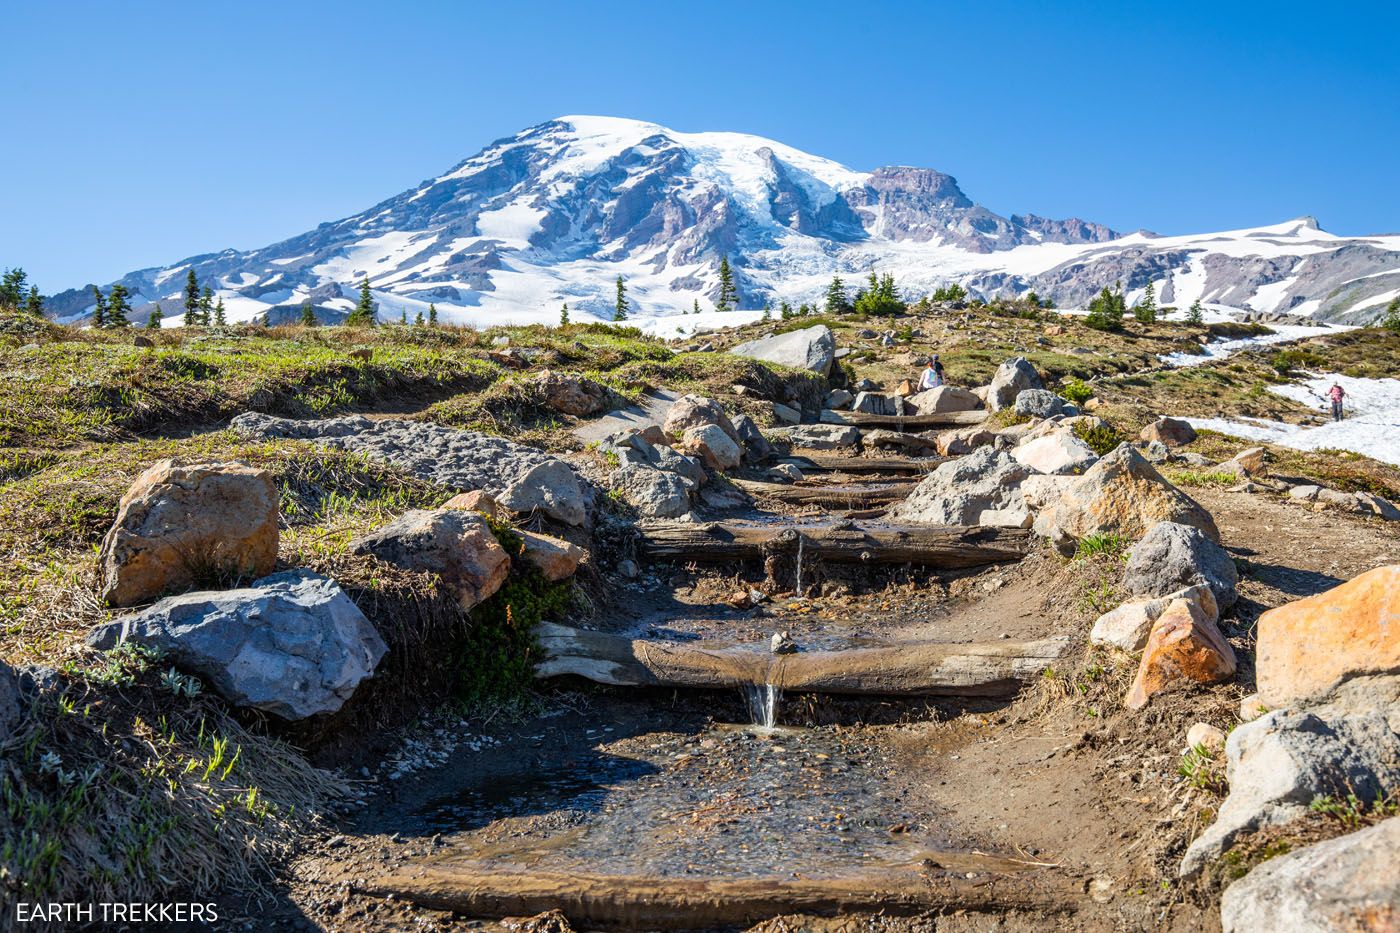
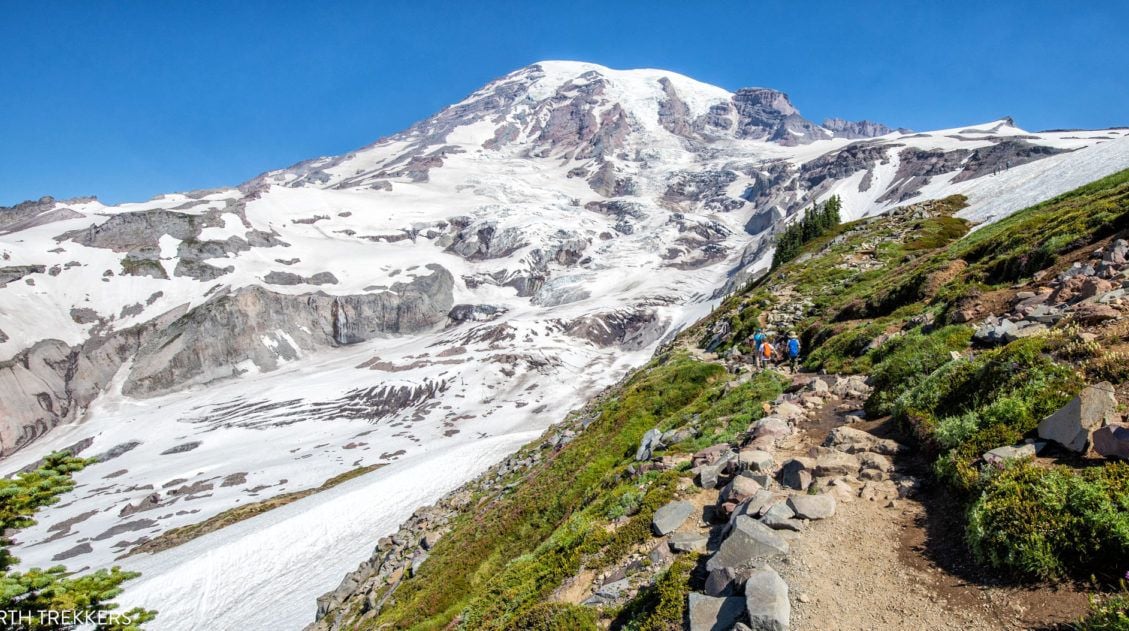
Skyline Trail Loop to Panorama Point: A Must-Do Hike
Distance: 6.2 miles
Difficulty: Strenuous
Total Ascent: 1,900 feet
Time: 3 to 5 hours
Trailhead: Upper Paradise parking lot
Best for: First-time visitors who want the most iconic hike in Mount Rainier
Why it’s worth it: Continuous, dramatic views of Mount Rainier for almost the entire hike
Skip it if: You’re uncomfortable hiking on snowfields or sustained uphill climbs
The Skyline Trail is the most iconic hike in Mount Rainier National Park, and for good reason. If you only do one big hike in the park, this should be it.
The entire hike is a beauty. Starting in Paradise, the trail climbs steadily through wildflower meadows, past Myrtle Falls, and up toward Panorama Point. As you gain elevation, the views of Mount Rainier become increasingly dramatic. On clear days, you can also see Mount Hood and Mount St. Helens in the distance.
Unlike many mountain hikes that save the views for the summit, Skyline delivers almost nonstop scenery from start to finish.
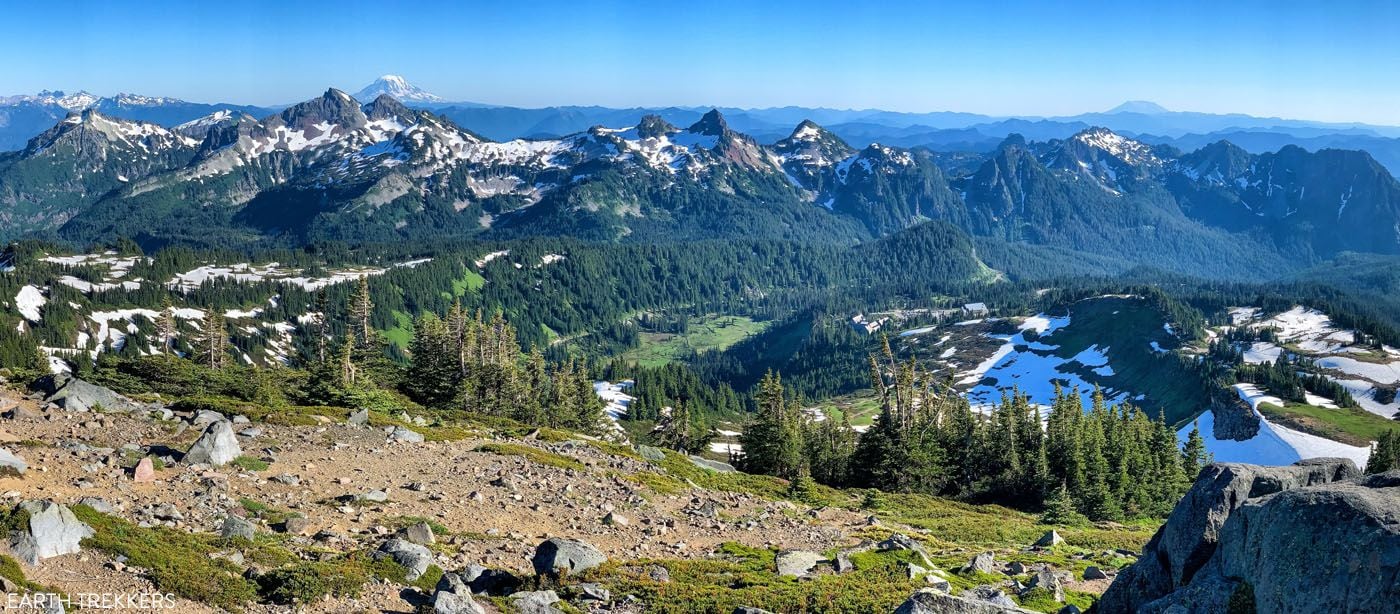
Panoramic view from the Skyline Trail
Clockwise or Counterclockwise?
You can hike this loop in either direction.
- Clockwise: Steeper climb early, gradual descent at the end
- Counterclockwise: Gradual climb, steeper descent later, for the majority hike you get great views of Mount Rainier
We hiked it in both directions and found both equally rewarding. We prefer hiking it in the counterclockwise direction, so you get the amazing views of Mount Rainier for a longer portion of the hike.
What to Know Before You Go
- Snowfields often linger into July and sometimes August. Hiking poles and a GPS device (we wear Garmin Fenix watches) are extremely helpful.
- This is one of the busiest trails in the park so arrive early for parking.
- Weather changes quickly; clouds can obscure the mountain entirely.
If you’re deciding between Skyline and Mount Fremont Lookout: Skyline offers more sustained mountain views and alpine scenery, but it also attracts larger crowds.
For a detailed, step-by-step breakdown of the route, see our Skyline Trail Loop guide.
Skyline Trail to Panorama Point
Exactly how to hike the Skyline Trail Loop to Panorama Point.Camp Muir: An Epic Adventure
Distance: 8 miles
Difficulty: Very strenuous
Total Ascent: 4,800 feet
Time: 8 to 10 hours
Trailhead: Upper Paradise parking lot
Best for: Strong, experienced hikers who want a true alpine climb without needing a summit permit
Why it’s worth it: A high-elevation, snowfield ascent with dramatic glacier views and a mountaineering atmosphere
Skip it if: You’re not comfortable hiking long distances on snow or navigating in changing weather
Camp Muir is as close as most hikers can get to the summit of Mount Rainier without a climbing permit. Sitting at 10,188 feet, this route takes you far above the meadows of Paradise and into the snow-covered slopes of the mountain.
The hike begins on the Skyline Trail and branches off at Pebble Creek. From there, the terrain changes dramatically. Trees disappear, snow becomes continuous for much of the route, and the climb steepens as you ascend toward Camp Muir.
Unlike many trails in the park, this route is largely exposed, with little shade and few clear trail markers once you’re on the snowfield. Good weather and clear visibility are critical. On cloudy days, route-finding can become challenging.
This is not a technical climb, but it is physically demanding. The sustained uphill effort, high elevation, and snow travel make this one of the toughest day hikes in the park.
Seasonal note: Snow is present on this route most of the hiking season. Even in August, you will likely be traveling on snow for a significant portion of the ascent.
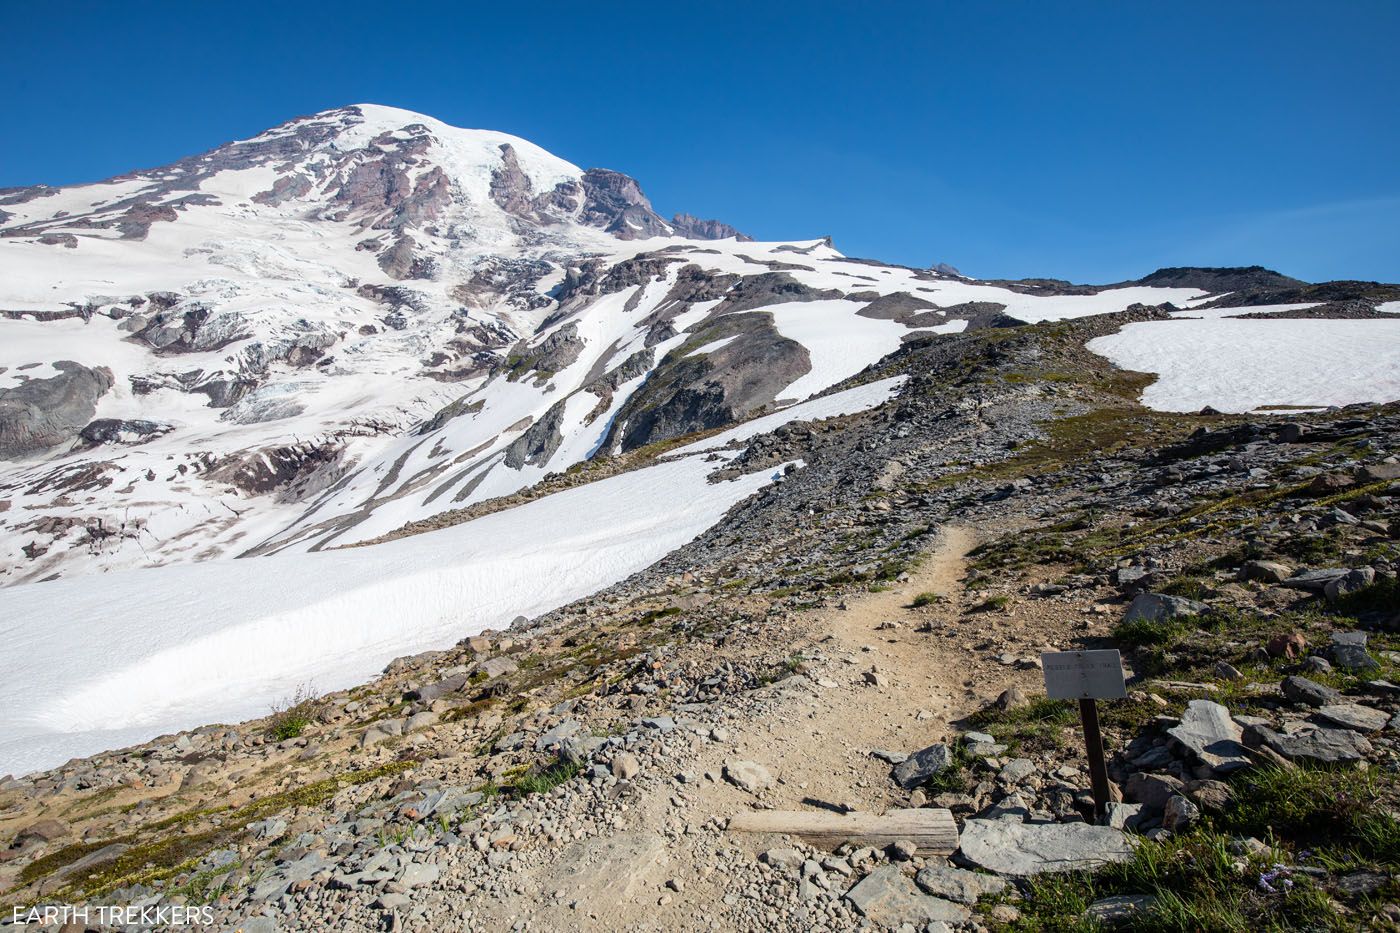
Pebble Creek Trail to Camp Muir
Bench and Snow Lakes: Capture the Reflection of Mount Rainier
Distance: 2.7 miles
Difficulty: Moderate
Total Ascent: 750 feet
Time: 1.5 to 2.5 hours
Trailhead: The trailhead is located on Stevens Canyon Road, 5 miles east of the Paradise visitor center. The trailhead is labeled as “Bench and Snow Lake Trail” on Google Maps.
Best for: Visitors looking for a shorter, moderate hike with lake reflections of Mount Rainier
Why it’s worth it: Peaceful alpine lakes with beautiful mountain views and fewer crowds than Paradise
Skip it if: You want continuous mountain views for the entire hike
Bench and Snow Lakes are a quieter alternative to the heavily trafficked trails in the Paradise area of Mount Rainier National Park.
The hike begins with a steady climb through open meadows and forest before reaching a spur trail to Bench Lake. From the shoreline, you get one of the most serene views in the park: Mount Rainier reflected in the still waters of the lake on calm days.

Bench Lake
Continuing on the main trail, you’ll climb another half mile to Snow Lake. The views here are more enclosed, but the setting is peaceful and often less crowded than nearby hikes.
Snow Lake
This hike works well as a half-day outing or as a lower-effort option before tackling a bigger trail like Skyline.
Hikes in the Sunrise Area
Sunrise is similar to Paradise, with amazing views of Mount Rainier and a multitude of hikes to choose from, depending on your activity level. It is located north of Mount Rainier.
Sourdough Ridge Trail to Frozen Lake: 3 Miles of Gorgeous Views
Distance: 3 miles
Difficulty: Moderate
Total Ascent: 500 feet
Time: 1.5 to 2 hours
Trailhead: Sunrise parking lot
Best for: Visitors who want big views with moderate effort
Why it’s worth it: Continuous ridge views of Mount Rainier without committing to a long hike
Skip it if: You’re looking for a summit-style payoff or dramatic final viewpoint
If you want expansive views without a long or strenuous climb, the Sourdough Ridge Trail to Frozen Lake is one of the best moderate hikes in Mount Rainier National Park.
Starting at Sunrise, the highest point accessible by car in the park, the trail climbs gradually along an open ridgeline. For much of the hike, Mount Rainier sits directly in front of you, making this one of the most visually rewarding hikes per mile. Be prepared for some seriously amazing views once you get to the top of the ridge.
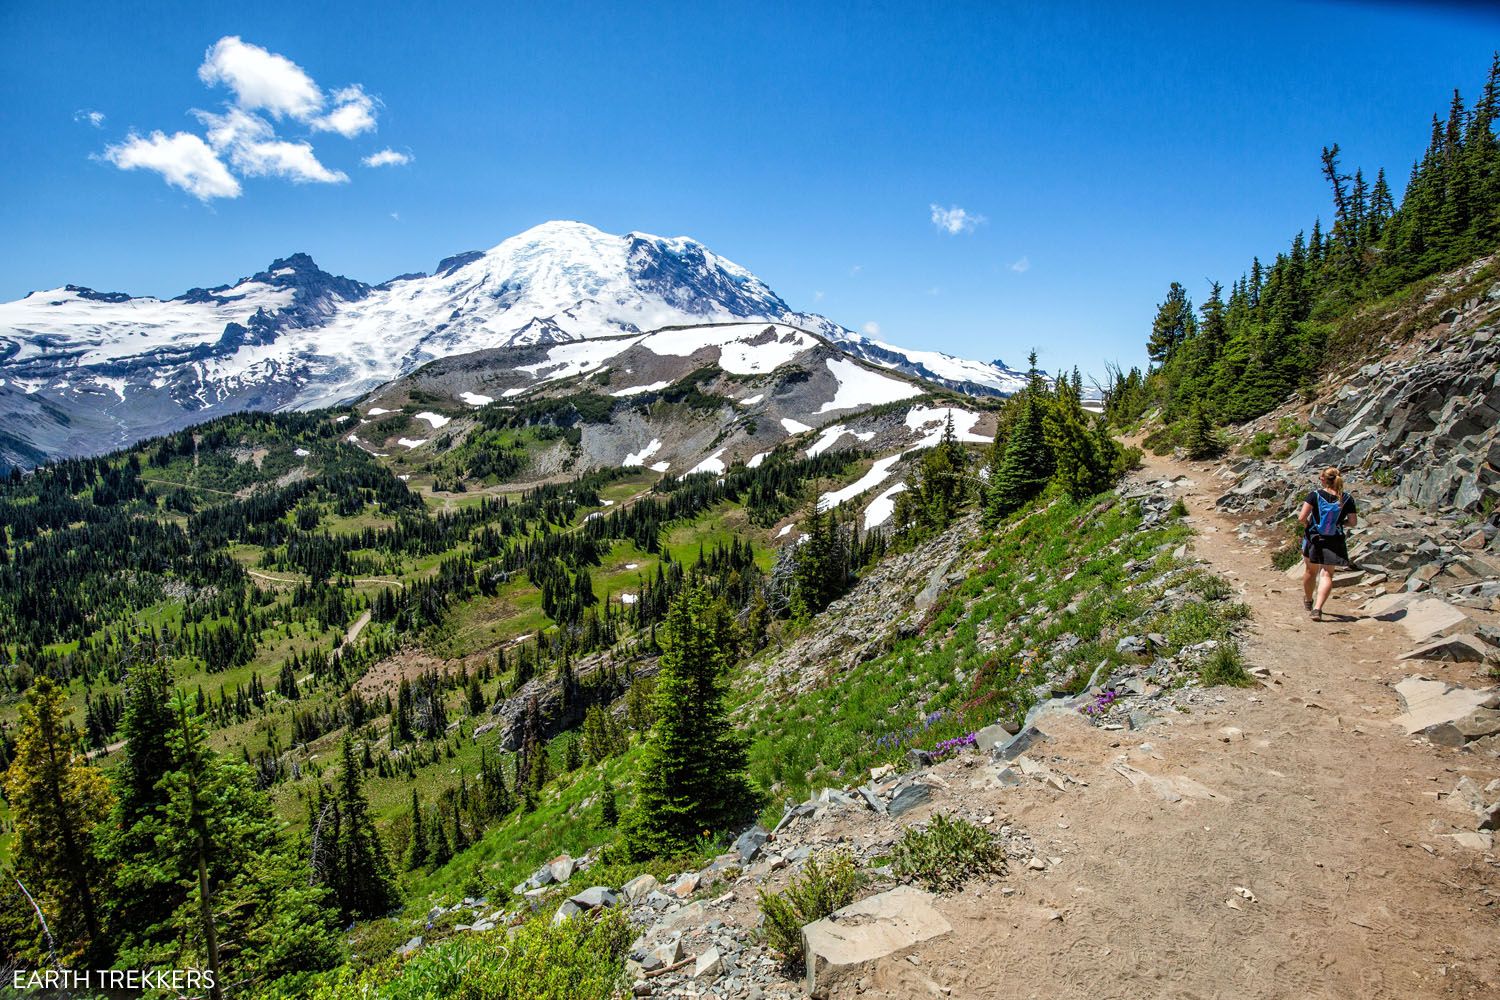
The ascent is steady but not overwhelming, making this a good option for hikers who want something more challenging than Myrtle Falls but aren’t ready for Skyline or Burroughs.
Frozen Lake itself is small and often partially frozen early in the season. The real reward here is the ridgeline walking and expansive views across the Sunrise area.
From Frozen Lake, you can continue the journey by hiking one of the two following trails.
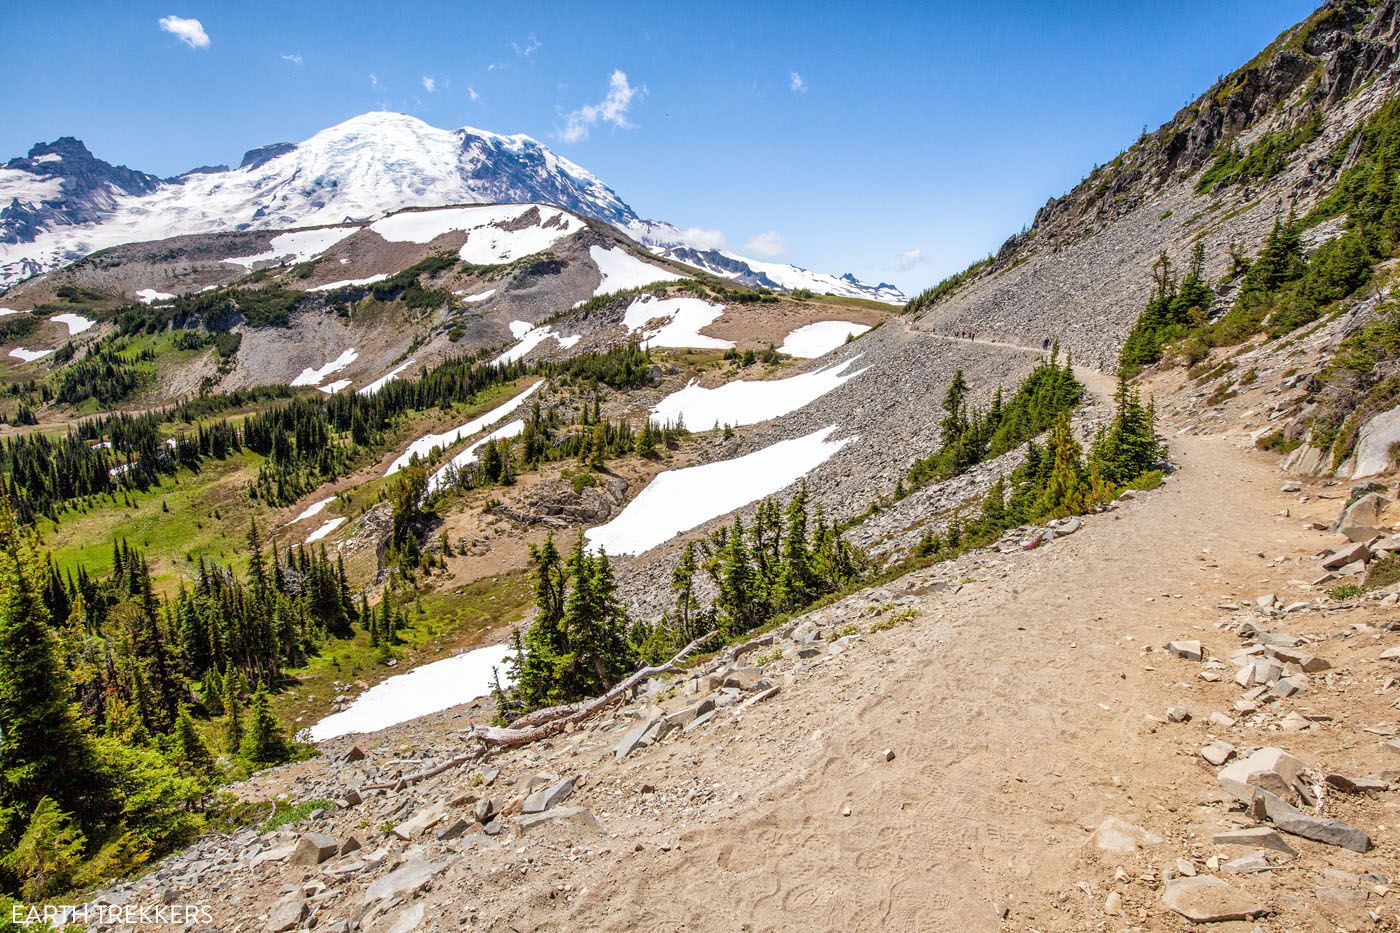
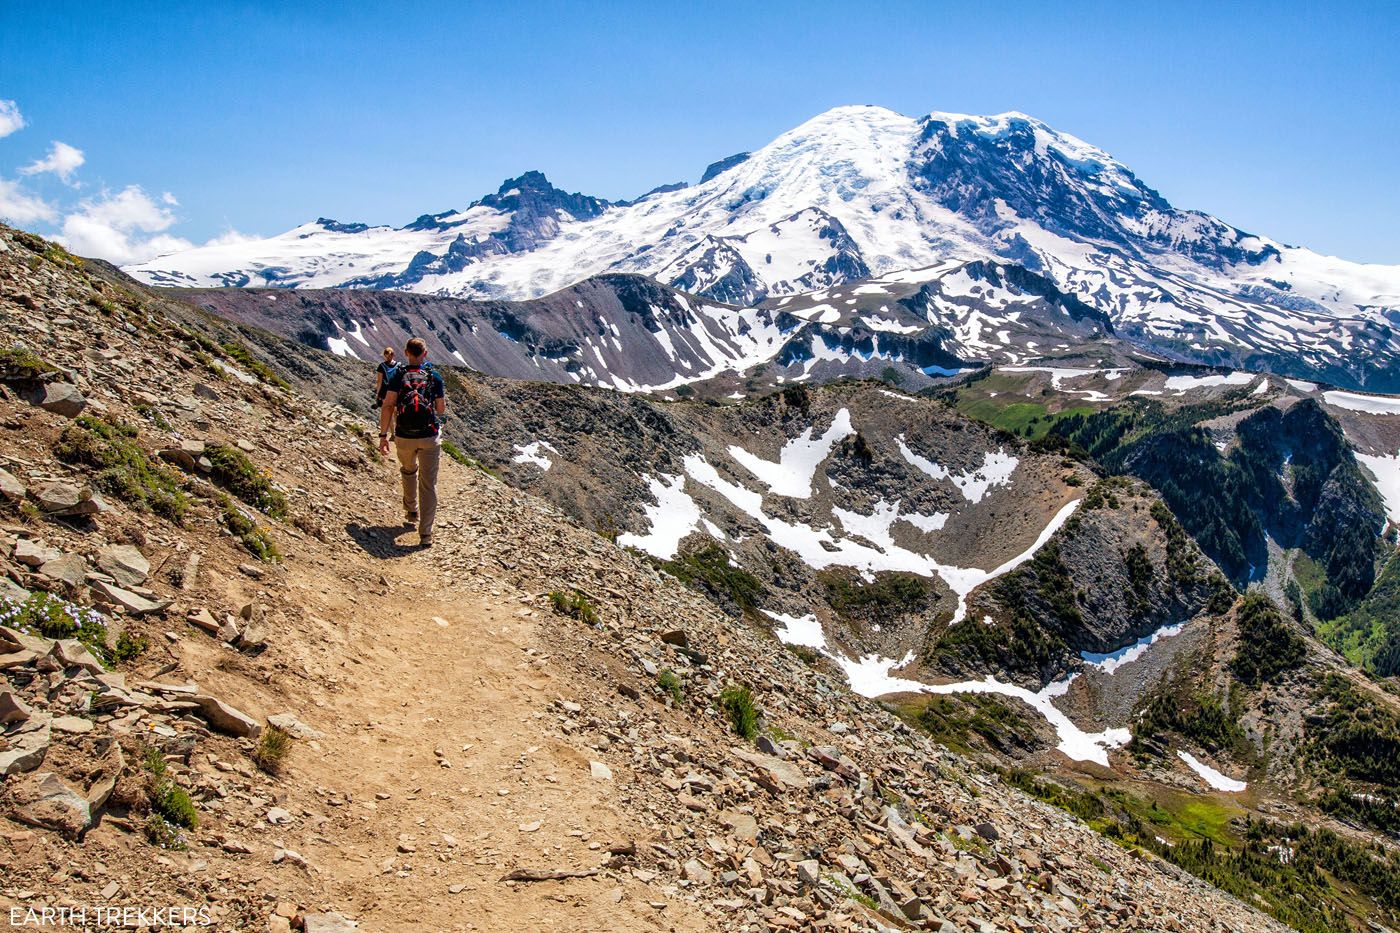
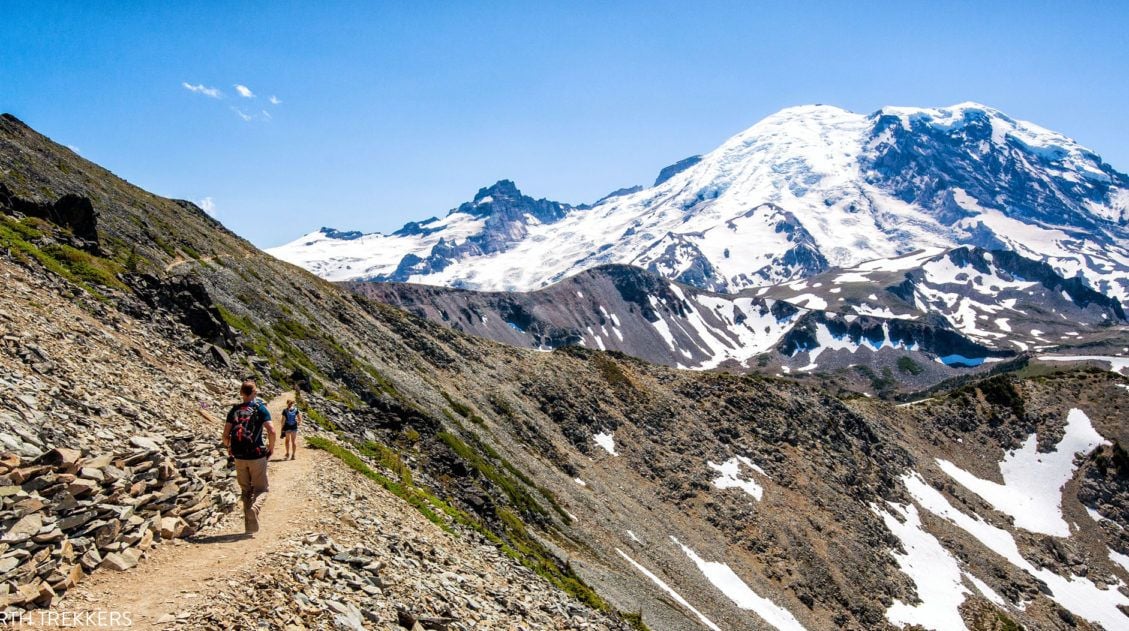
Burroughs Mountain Loop: Some of the Best Views of Mount Rainier
Distance: 6 to 9 miles
Difficulty: Strenuous
Total Ascent: Up to 2,500 feet
Time: 3 to 6 hours
Trailhead: Sunrise parking lot
Best for: Hikers who want some of the closest and most dramatic views of Mount Rainier
Why it’s worth it: Stark, high-alpine terrain and jaw-dropping, up-close mountain views
Skip it if: You prefer greener scenery or a shorter hike
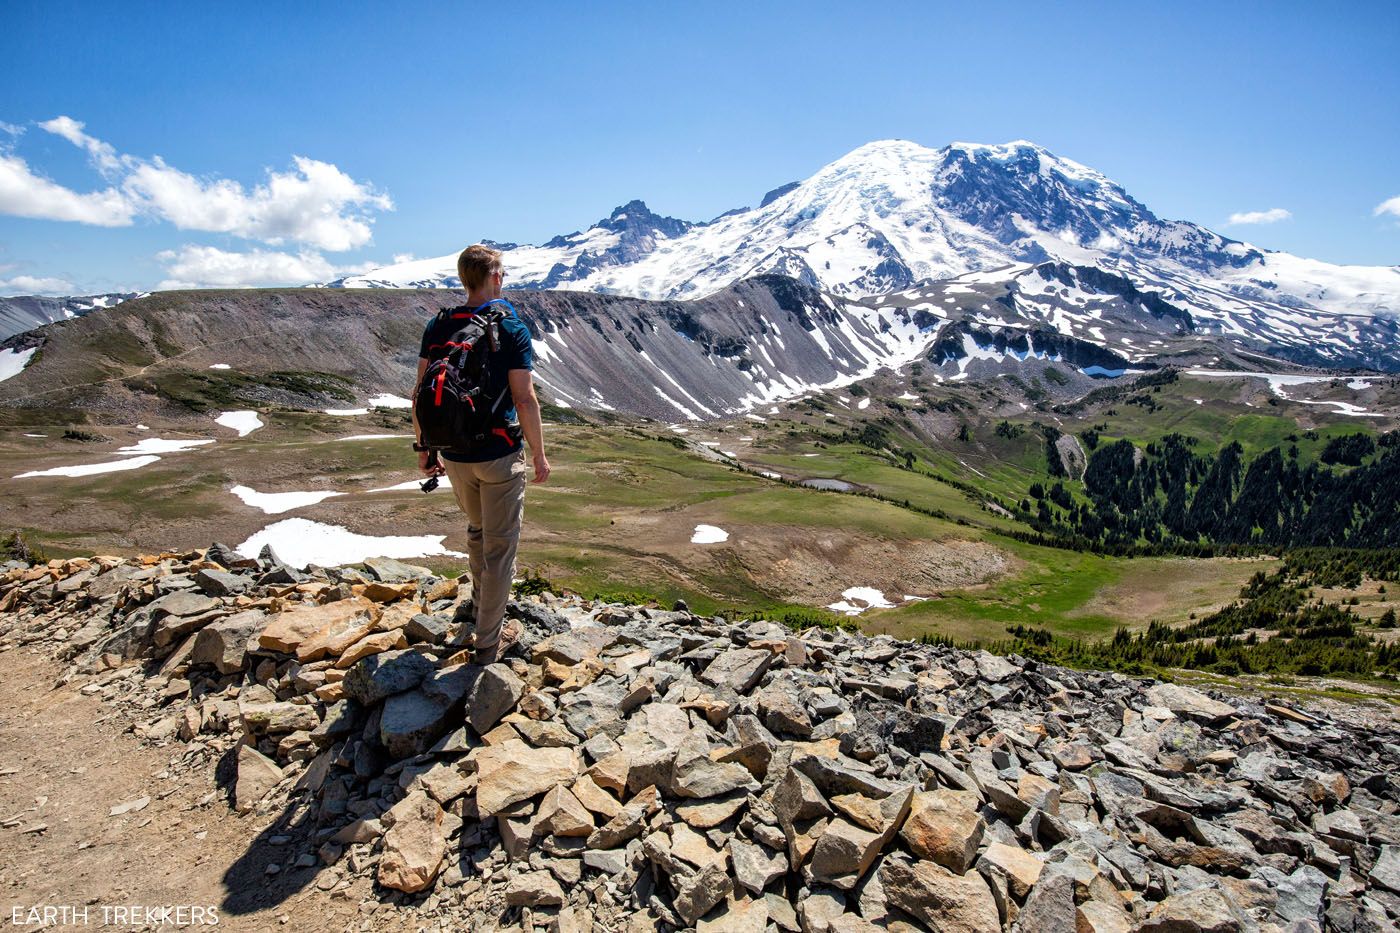
The Burroughs Mountain Trail delivers some of the most powerful views of Mount Rainier in the entire park.
Starting from Sunrise, you’ll follow the Sourdough Ridge Trail to Frozen Lake before branching off toward the Burroughs Mountains. As you climb higher, vegetation fades and the landscape becomes rugged and rocky, giving the hike an almost otherworldly feel.
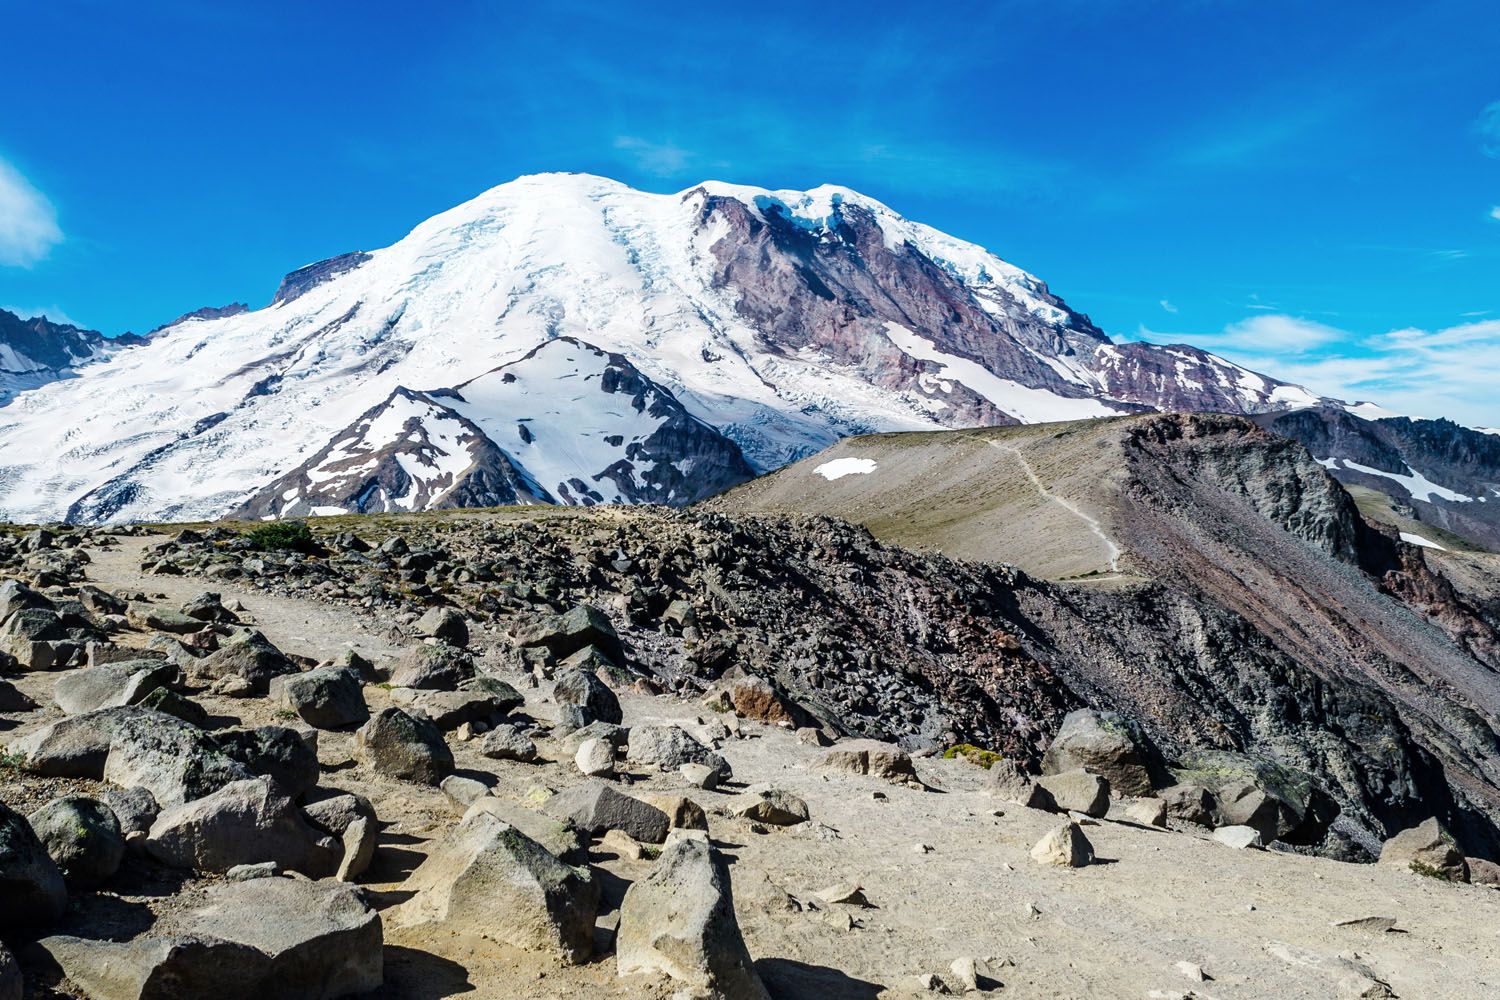
The closer you get to the second and third Burroughs summits, the more dominant Mount Rainier becomes. By the time you reach the higher viewpoints, you feel nearly face-to-face with the glacier-covered slopes of the mountain.
How Far Should You Go?
- First Burroughs: Shortest option, moderate extension
- Second Burroughs: Best balance of effort and reward (6 miles round trip)
- Third Burroughs: Longest and most dramatic option (about 9 miles round trip)
Most hikers turn around at the second summit, which delivers exceptional views without the full distance commitment.
If you’re debating between Mount Fremont and the Burroughs Mountain Loop, Fremont offers a scenic fire lookout finish and slightly easier terrain. Burroughs is more dramatic, more exposed, and delivers closer mountain views.

Mount Fremont Lookout Trail: Our Favorite Hike in Sunrise
Distance: 6 miles
Difficulty: Moderate
Total Ascent: 1,200 feet
Time: 2.5 to 5 hours
Trailhead: Sunrise parking lot
Best for: Hikers who want big mountain views without committing to a strenuous all-day climb
Why it’s worth it: A historic fire lookout with panoramic views of Mount Rainier and the surrounding peaks
Skip it if: You want a shorter hike or dislike exposed ridgeline walking
This was the very first hike we did in Mount Rainier and what a spectacular introduction to this park! We were blown away by the constant views of Mount Rainier, along a trail that isn’t all that difficult to hike.
We also explored this trail with friends who had never hiked before. It was an unforgettable experience for them and a great introduction to the wonderful world of hiking. For us, the views were just as breathtaking as when we first hiked this trail.
The Mount Fremont Lookout Trail is one of the most well-rounded hikes in Mount Rainier National Park. It combines steady climbing, open ridgeline views, and a dramatic summit payoff, without the intensity of Skyline or Burroughs.
The hike begins by following the Sourdough Ridge Trail to Frozen Lake before branching off toward Mount Fremont. From there, the trail climbs gradually along a wide, exposed ridge with Mount Rainier dominating the skyline.
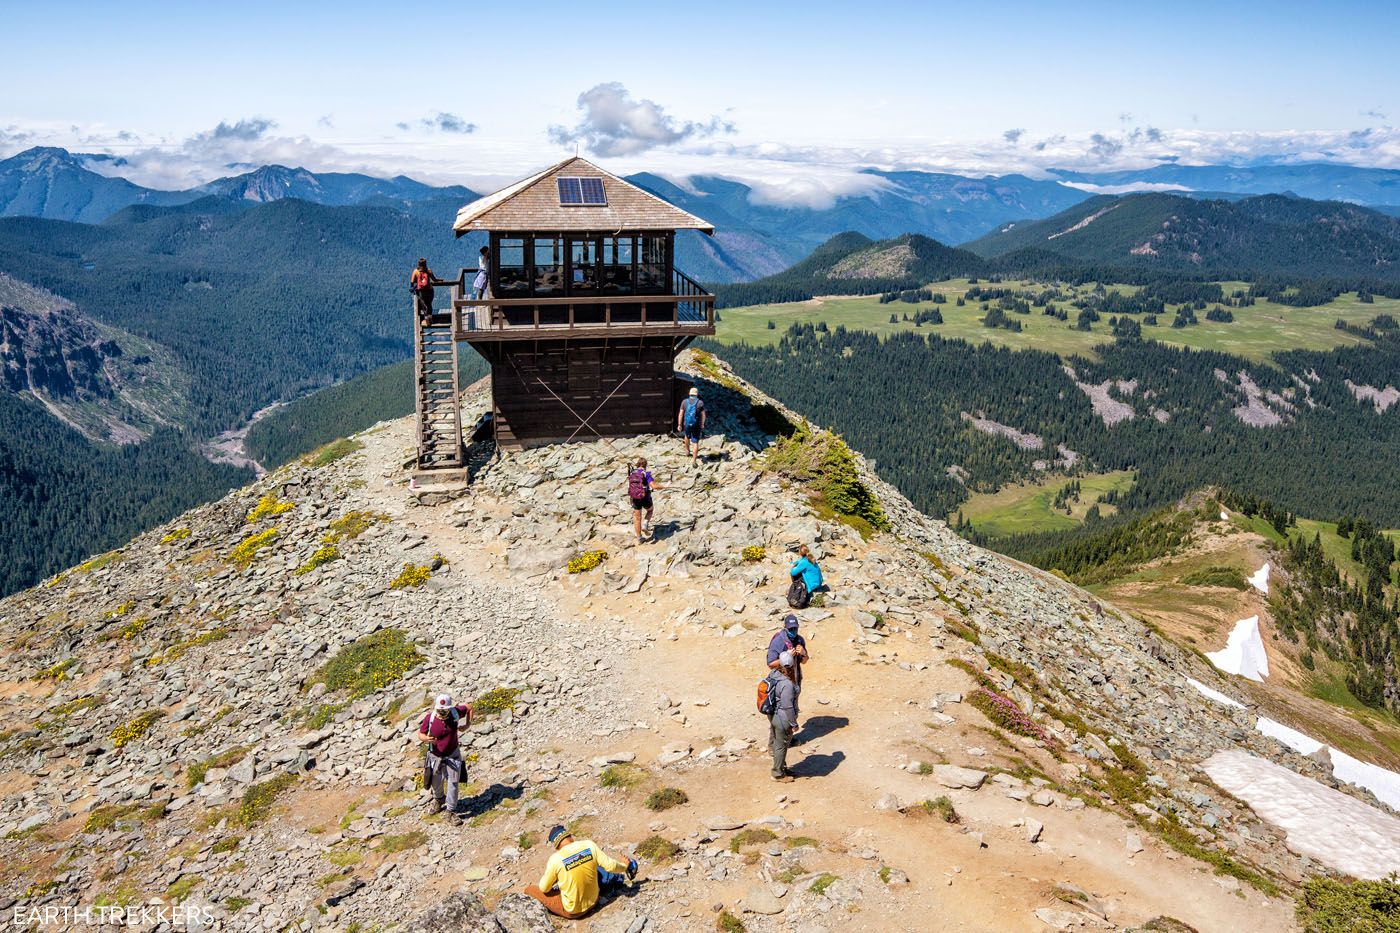
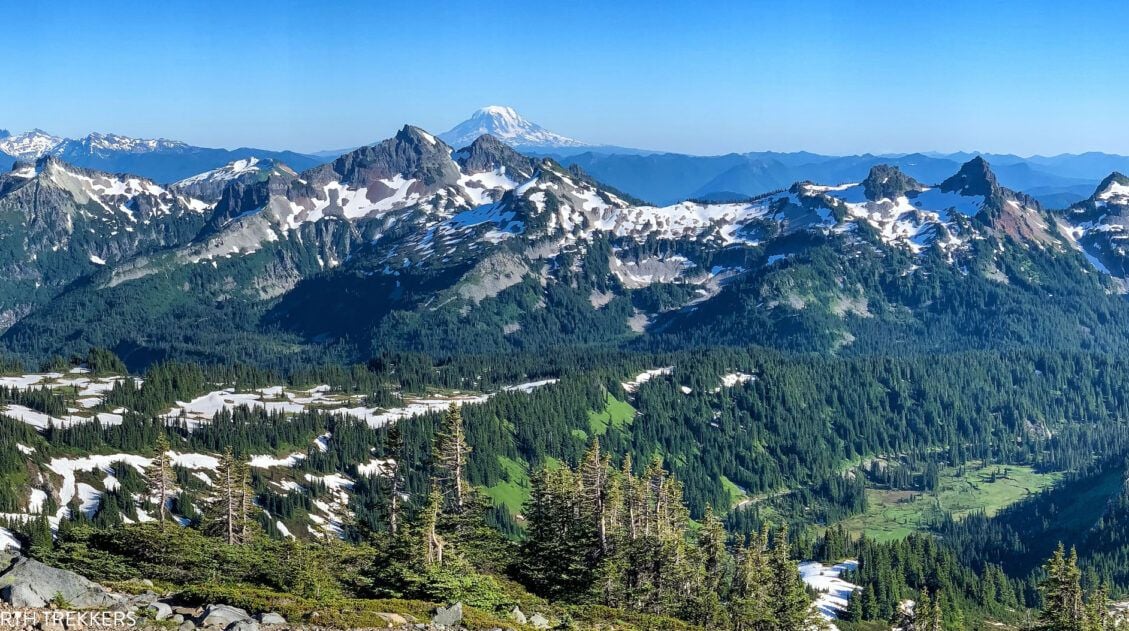
The final stretch to the historic fire lookout is the highlight. From the top, you get sweeping 360-degree views across the Sunrise area, with Mount Rainier front and center.
As a bonus, there is an open air pit toilet that just may be one of the most unique bathroom experiences you will ever have.
If you’re debating between Mount Fremont Lookout and the Skyline Trail Loop, Skyline offers more varied scenery and sustained views, but Fremont is less strenuous and often less crowded.
For a detailed, step-by-step breakdown of the route, see our Mount Fremont Lookout Trail guide.
Complete Guide to the Mount Fremont Lookout Trail
Step-by-step trail guide for the Mount Fremont Lookout Trail.The Summerland Trail to Panhandle Gap: A Little Bit of Everything
Distance: 12 miles
Difficulty: Strenuous
Total Ascent: 3,150 feet
Time: 5 to 7 hours
Trailhead: Sunrise Park Road, 4.3 miles from Mather Memorial Parkway and 11.2 miles from the Sunrise Visitor Center. The trailhead is labeled as “Summerland Trail” on Google Maps.
Best for: Strong hikers who want a long, scenic day with diverse terrain
Why it’s worth it: Wildflower meadows, alpine lakes, and high-mountain views in one hike
Skip it if: You’re short on time or looking for immediate, nonstop mountain views
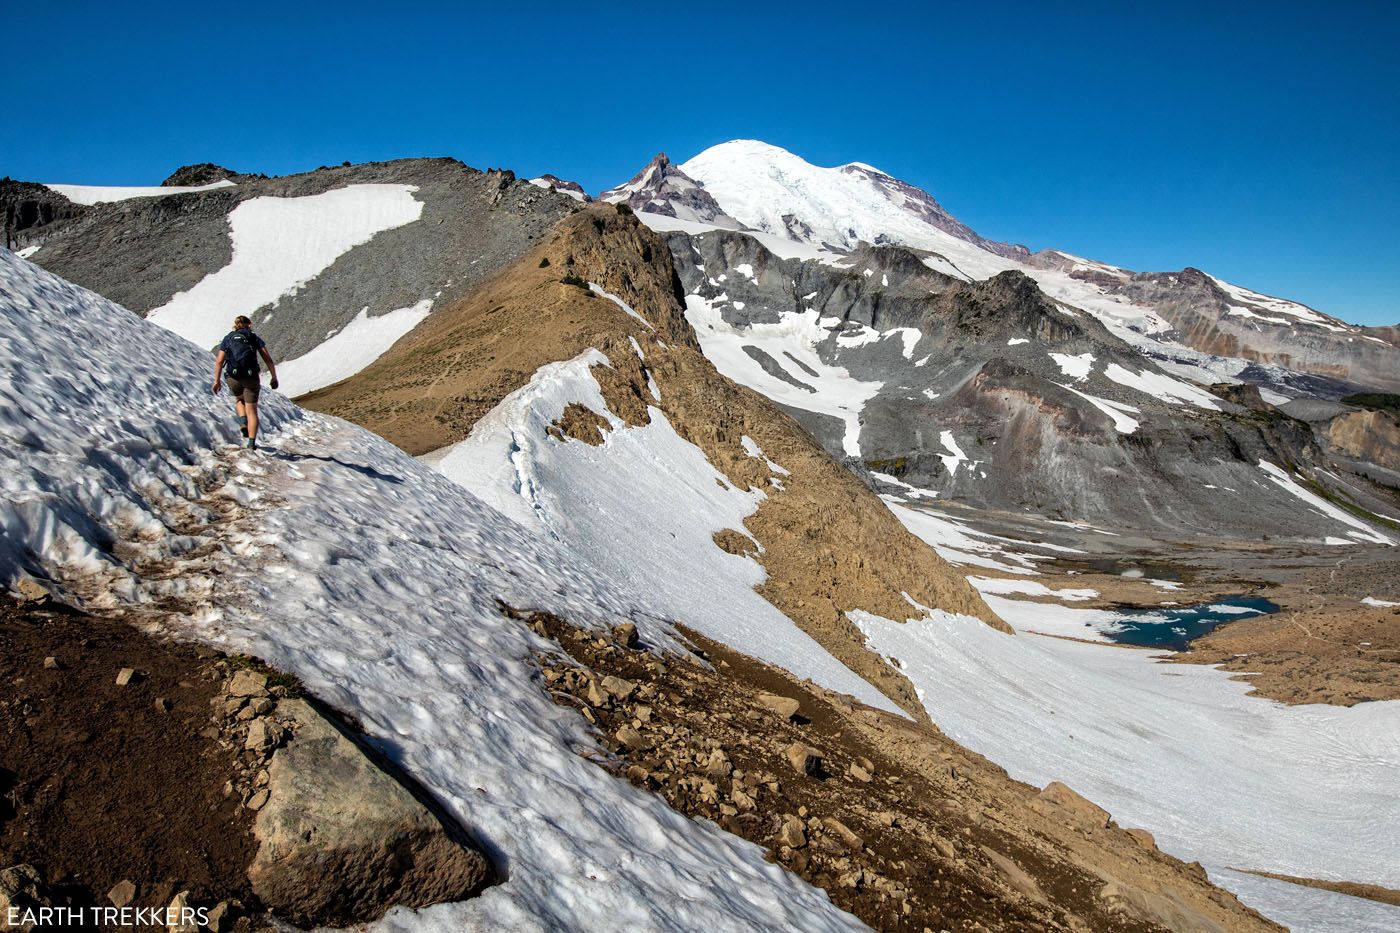
Hiking the Summerland Trail to Panhandle Gap is on the longer and more difficult side, but it has a little bit of everything…old growth forests, fields of wildflowers, views of Mount Rainier, the chance to spot wildlife, high alpine views, and panoramic views out to Mount Adams.
This hike is located in the Sunrise area, just a short drive from the Sunrise visitor center.
The first half of the hike is a gradual uphill walk through old growth forests and fields of wildflowers. After one steep climb up a series of switchbacks, you emerge in Summerland. This is a beautiful area where the mountain slopes are covered with wildflowers and marmots scurry along the trail. You can turn around at this point, making the hike 9 miles round trip.
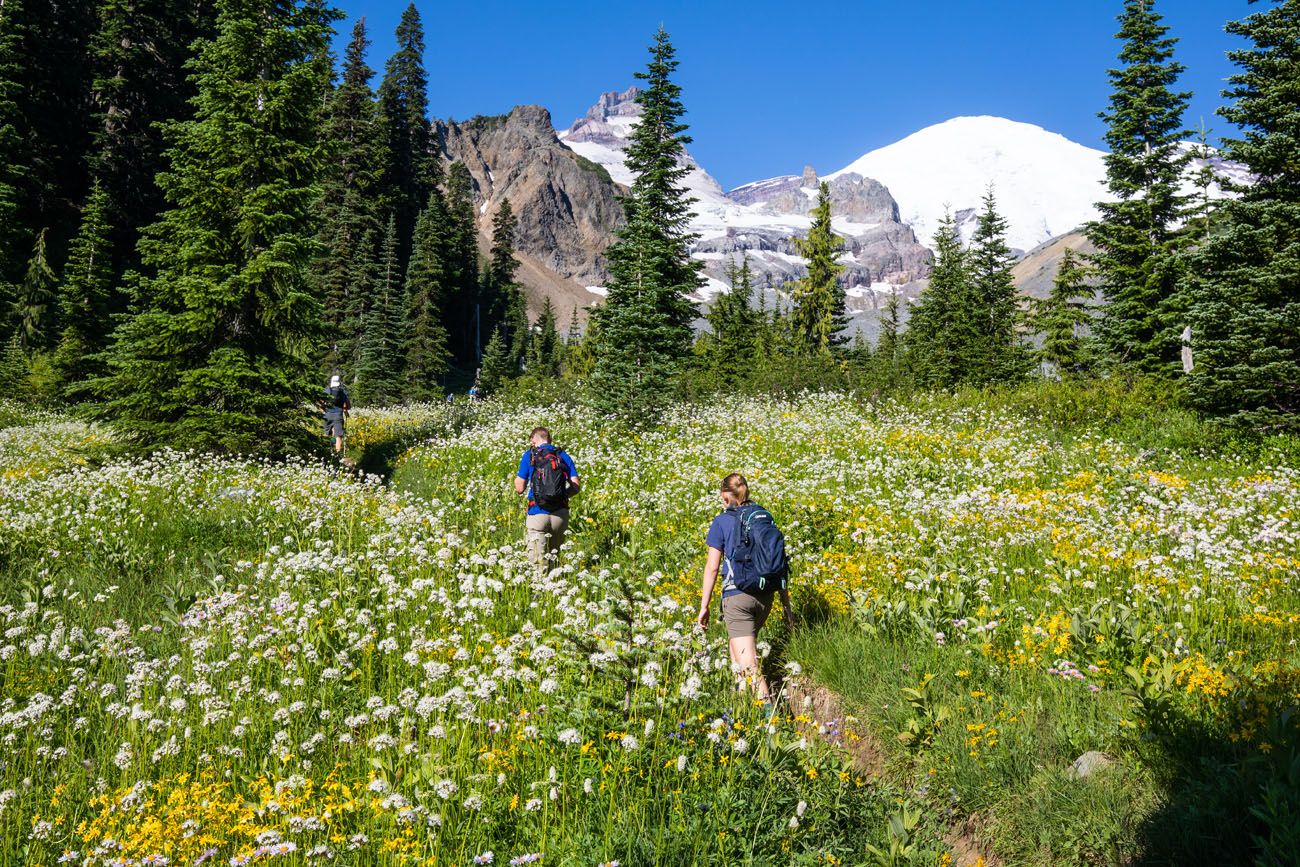
Summerland
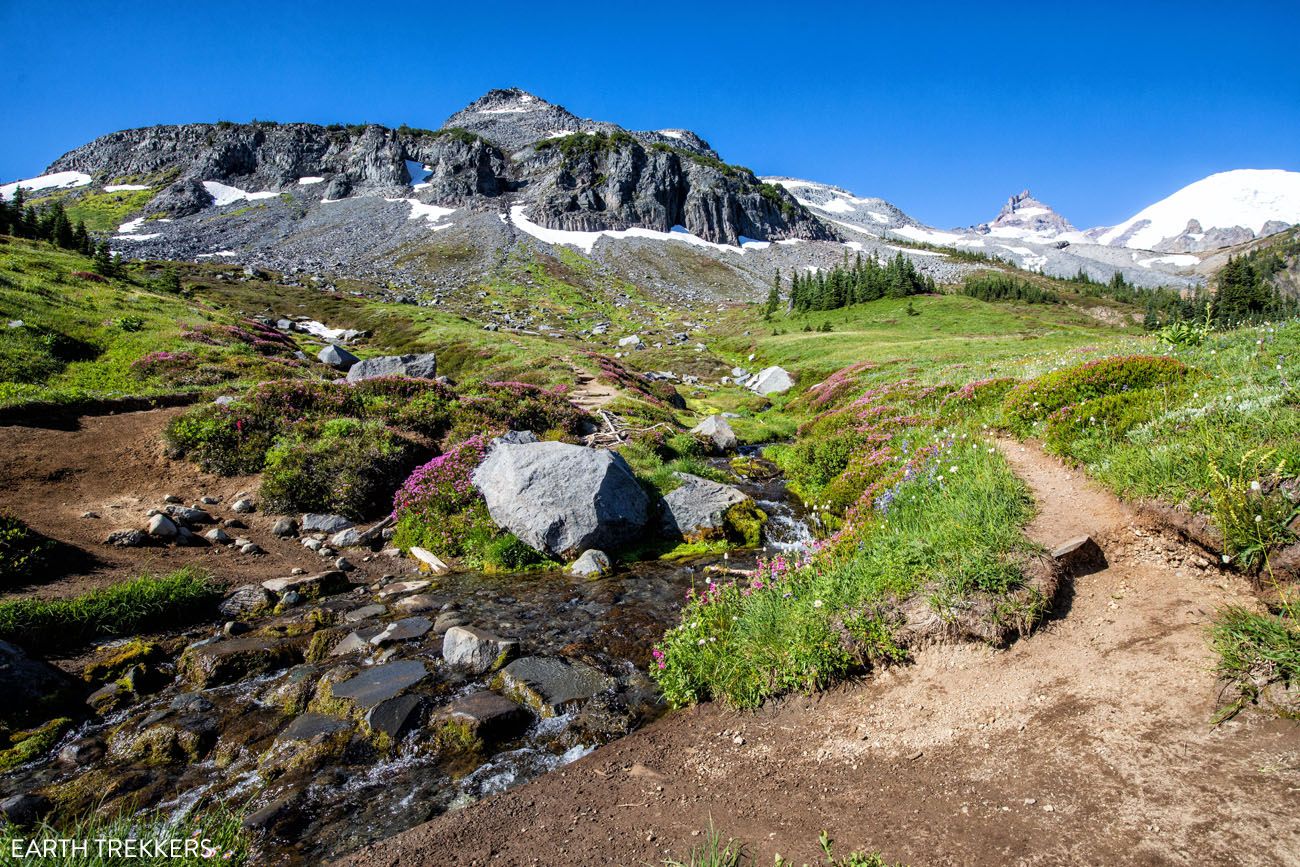
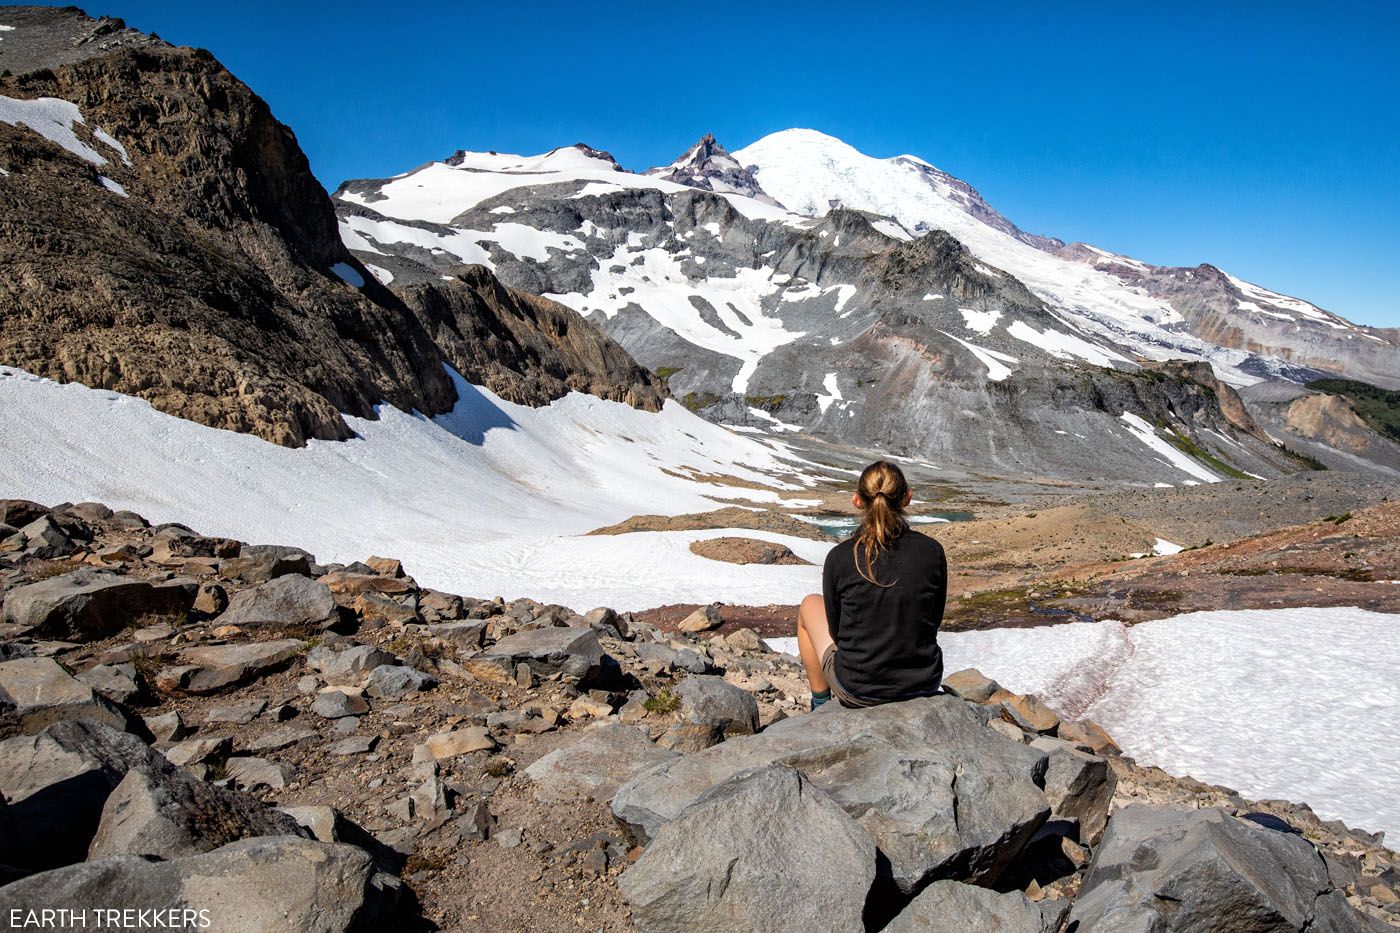
However, if you keep going, you enter the subalpine region where the vegetation disappears, snow appears on the trail, and you hike past a frozen lake. The peak of Mount Rainier looms to your right.
After one more big climb, you get panoramic views of the park and on a clear day, you can see Mount Adams.
Final climb to Panhandle Gap
We really enjoyed this hike and recommend it for those who like the idea of walking through a wide variety of terrain and want to leave the crowds behind.
For a detailed, step-by-step breakdown of the route, see our Summerland to Panhandle Gap Trail Guide ↓
How to Hike the Summerland Trail to Panhandle Gap
Step-by-step trail guide for the Summerland Trail to Panhandle Gap.Naches Peak Loop: Alpine Lakes & Wildflowers
Distance: 3.6 miles
Difficulty: Easy to moderate
Total Ascent: 680 feet
Time: 1.5 to 2.5 hours
Trailhead: The largest parking lot is at the Tipsoo Comfort Station but from here you will do a little extra walking to get to the trailhead. There are also two parking areas on Highway 410, where the trail crosses the road. If you get here early, or are extremely lucky, you can park at one of the few spots right at the southern trailhead (this is where we parked): 46°52’02.0″N 121°31’05.5″W. You can also park at the very small parking lot at the northern trailhead on Highway 410: 46°52’21.2″N 121°30’56.1″W.
Best for: A shorter scenic hike with wildflowers and classic Mount Rainier views
Why it’s worth it: Big views, alpine lakes, and wildflower meadows in a manageable loop
Skip it if: You’re looking for a challenging summit or fewer crowds
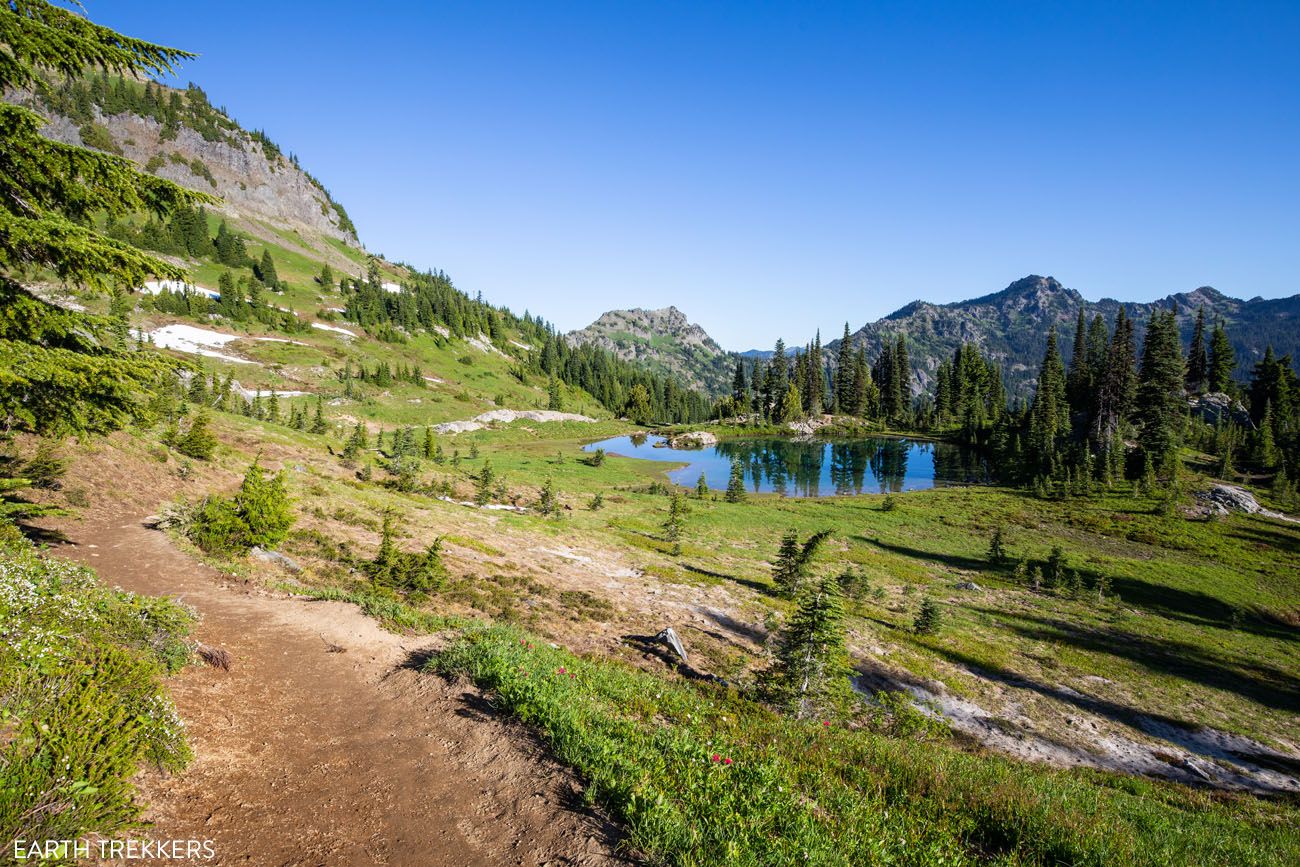
Naches Peak Loop is one of the most scenic short hikes in Mount Rainier National Park, especially during wildflower season. Half of the trail also includes a portion of the Pacific Crest Trail.
Located at Chinook Pass, this loop combines open meadows, small alpine lakes, and excellent views of Mount Rainier. Because of its relatively short distance and rewarding scenery, it’s a popular choice in mid-to-late summer.
Since this is a loop, this hike can be done in either direction. From the small southern parking lot on Highway 410, next to Tipsoo Lake (GPS coordinates listed above), we did this hike counter-clockwise. The first section is on the PCT and goes through a forest. On this section of the hike, you occasionally have views of Mount Rainier but you will need to turn around for these views.
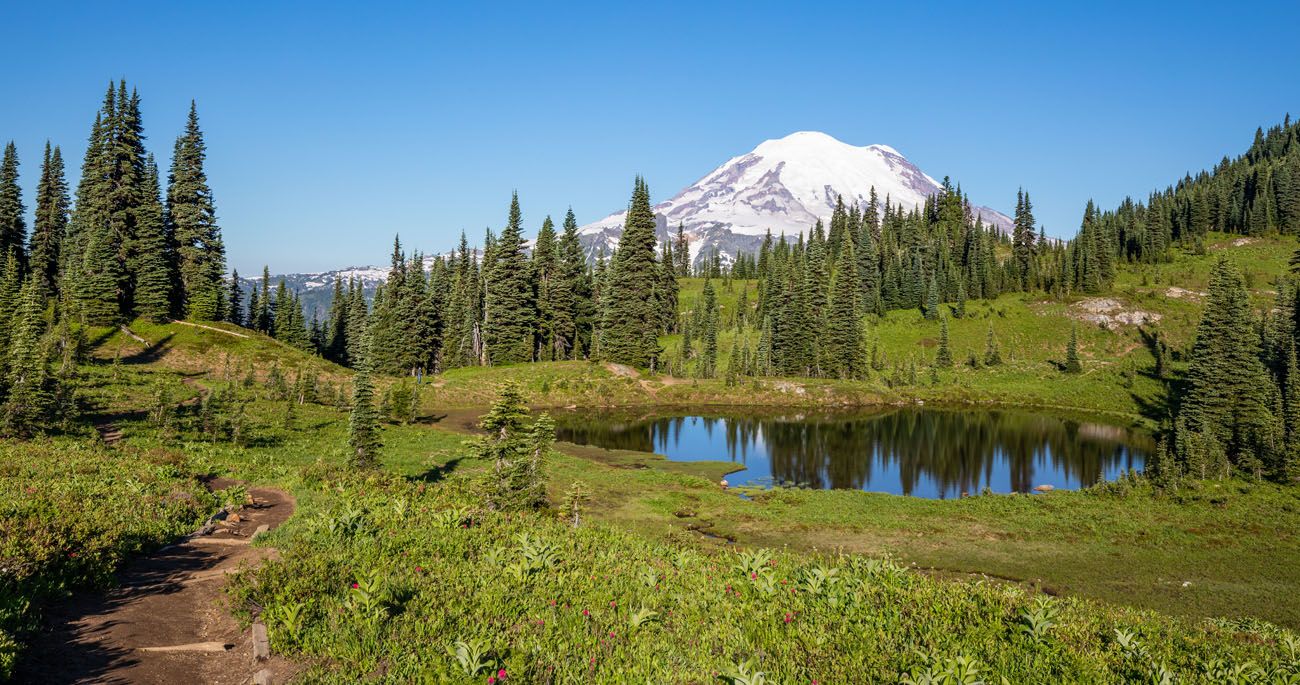
About halfway through the loop, as you head back to Tipsoo Lake, the trees thin out and the views get better, in my opinion. You will walk past a small lake, cross Highway 410 on a wooden pedestrian bridge, and then drop down to Tipsoo Lake.
Seasonal note: Chinook Pass typically opens around late May to early June, depending on snowfall. Snow can linger on the trail into early summer.
Hikes in Ohanapecosh
In Ohanapecosh, which is on the southeastern corner of the park, you are tucked away in the ancient forests. A visit here isn’t so much about big views of Mount Rainier. Instead, you can walk through forests of trees that are hundreds of years old.
Grove of the Patriarchs: See the Oldest Trees in the Park
Distance: 1.5 miles
Difficulty: Easy
Total Ascent: Minimal
Time: 1 hour
Trailhead: On Stevens Canyon Road next to the Stevens Canyon entrance. It is labeled “Grove of the Patriarchs Trail” on Google Maps. The parking lot has space for about 20 cars. It can be challenging to get a parking space here midday during the summer months.
Best for: First-time visitors who want to experience Mount Rainier’s old-growth forest
Why it’s worth it: Towering ancient trees and a suspension bridge crossing the Ohanapecosh River
Skip it if: You’re only interested in big mountain views
IMPORTANT:The Grove of the Patriarchs Trail is closed due to damage to the suspension bridge from flooding. Construction on the new bridge is expected to start in 2027, and the trail will be closed until its completion. Get updates on the National Park Service website.
Walking through the Grove of the Patriarchs is an essential hike if it is your first visit to Mount Rainier National Park.
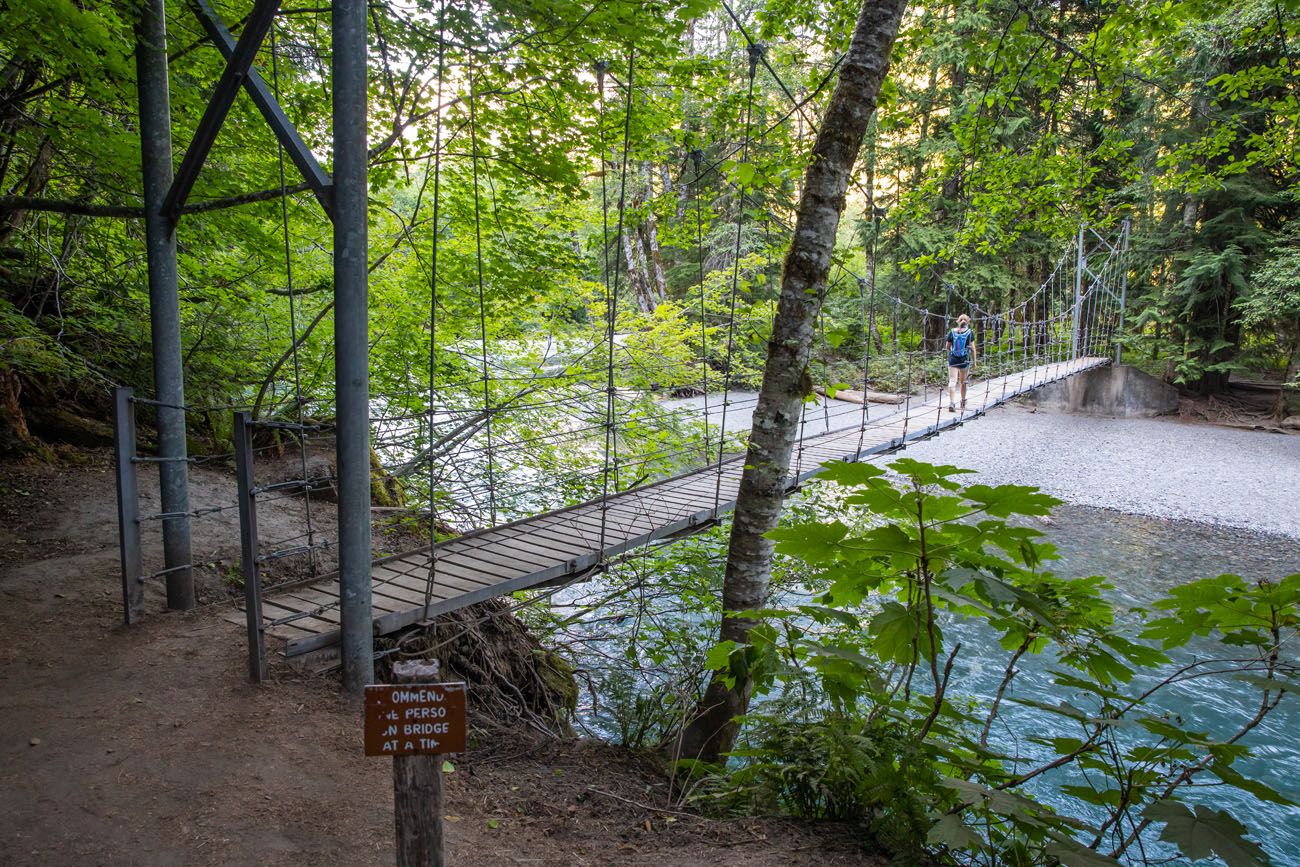
Kara walking across the suspension bridge (before it was damaged by flooding).
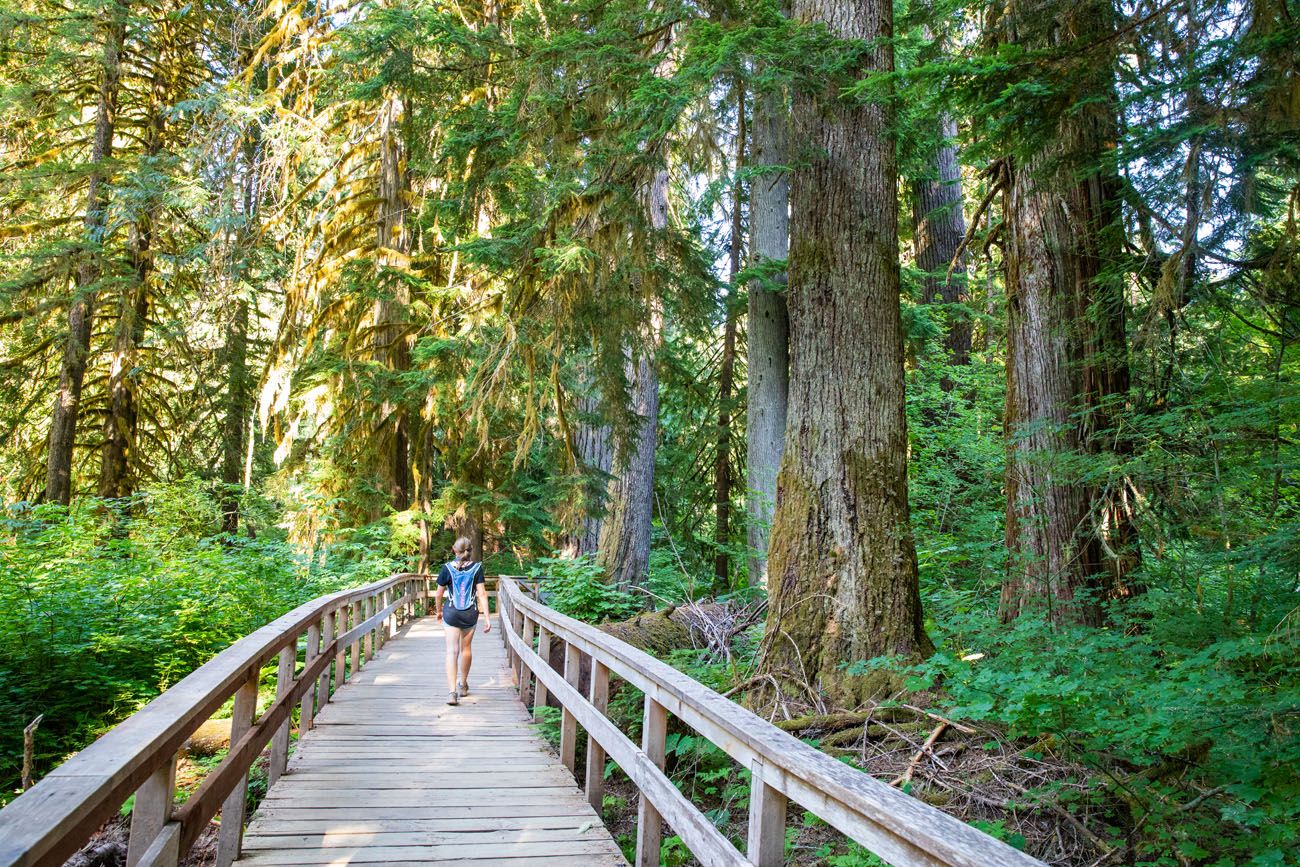
This easy, 1.5-mile walking trail takes you past some of the largest and oldest trees in Mount Rainier National Park. These ancient Douglas firs, western red cedars, and western hemlocks are enormous. You will cross a suspension bridge and then walk on a series of boardwalk and dirt trails through the forest.

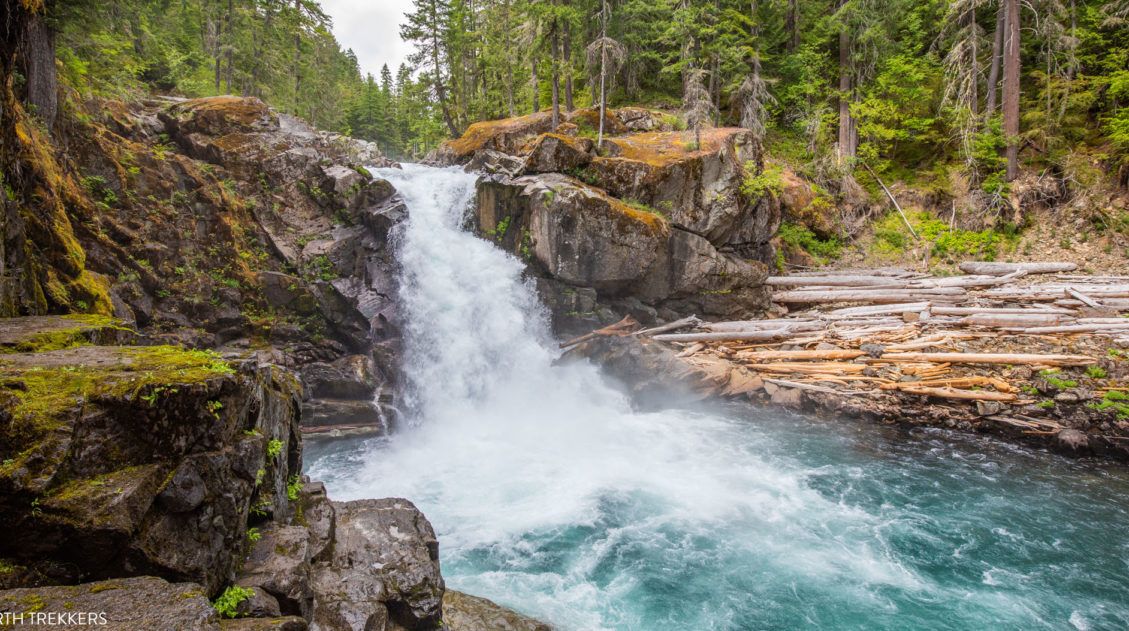
Silver Falls Loop: Best Waterfall Hike
Distance: 3.4 miles
Difficulty: Easy
Total Ascent: 670 feet
Time: 1.5 to 3 hours
Trailhead: Since this is a loop, there are several trailheads. The best place to park is at the Ohanapecosh Visitor Center. See our hiking post for more details.
Best for: An easy-to-moderate forest hike with a dramatic waterfall payoff
Why it’s worth it: One of the most impressive waterfalls in Mount Rainier National Park
Skip it if: You’re only interested in Mount Rainier summit views
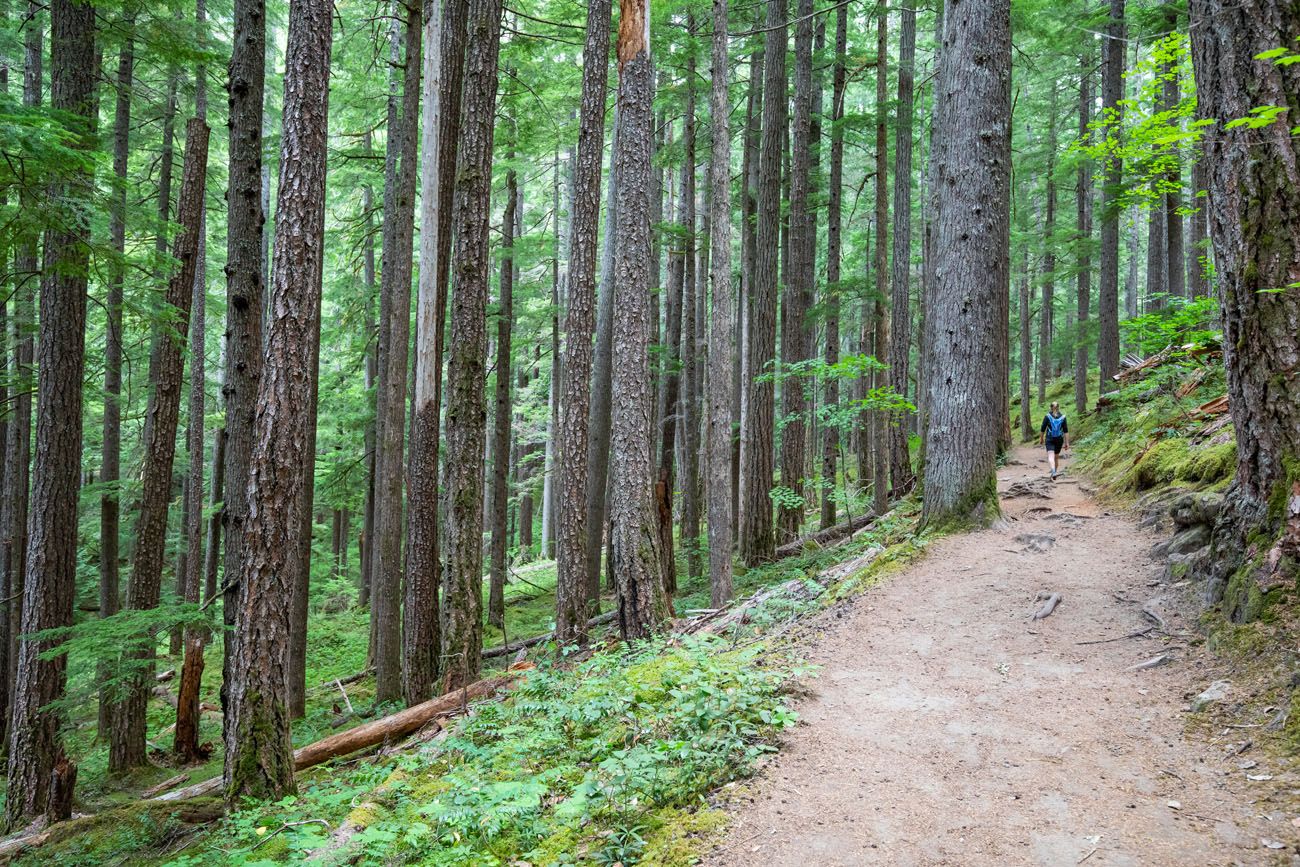
Silver Falls Loop is one of the most underrated hikes in Mount Rainier National Park. What it lacks in views of Mount Rainier, it makes up for in its easy walkability and breathtaking views of Silver Falls.
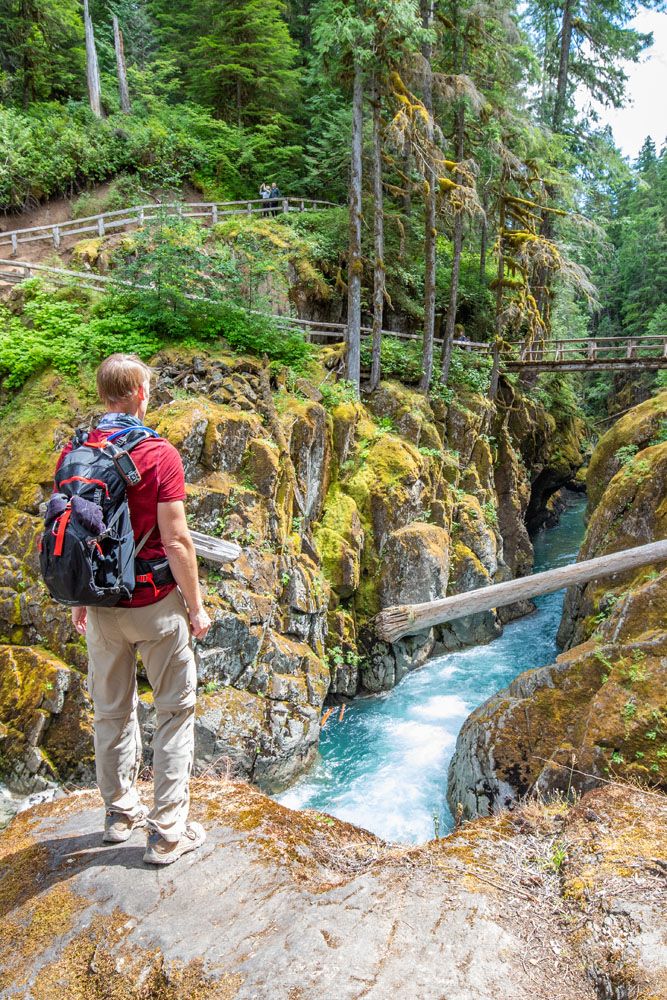
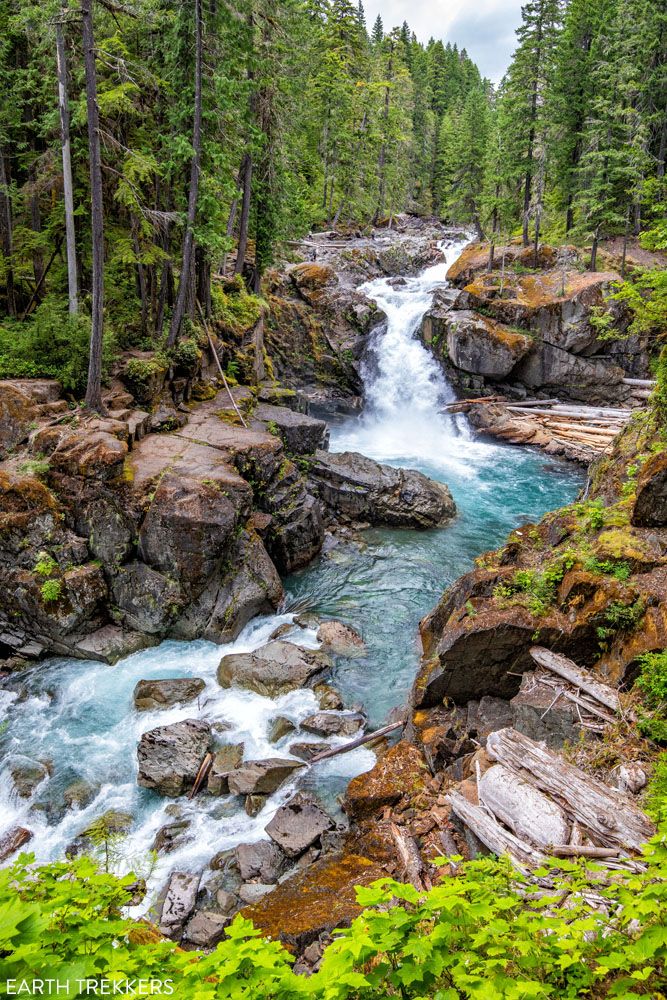
The gorge and Silver Falls
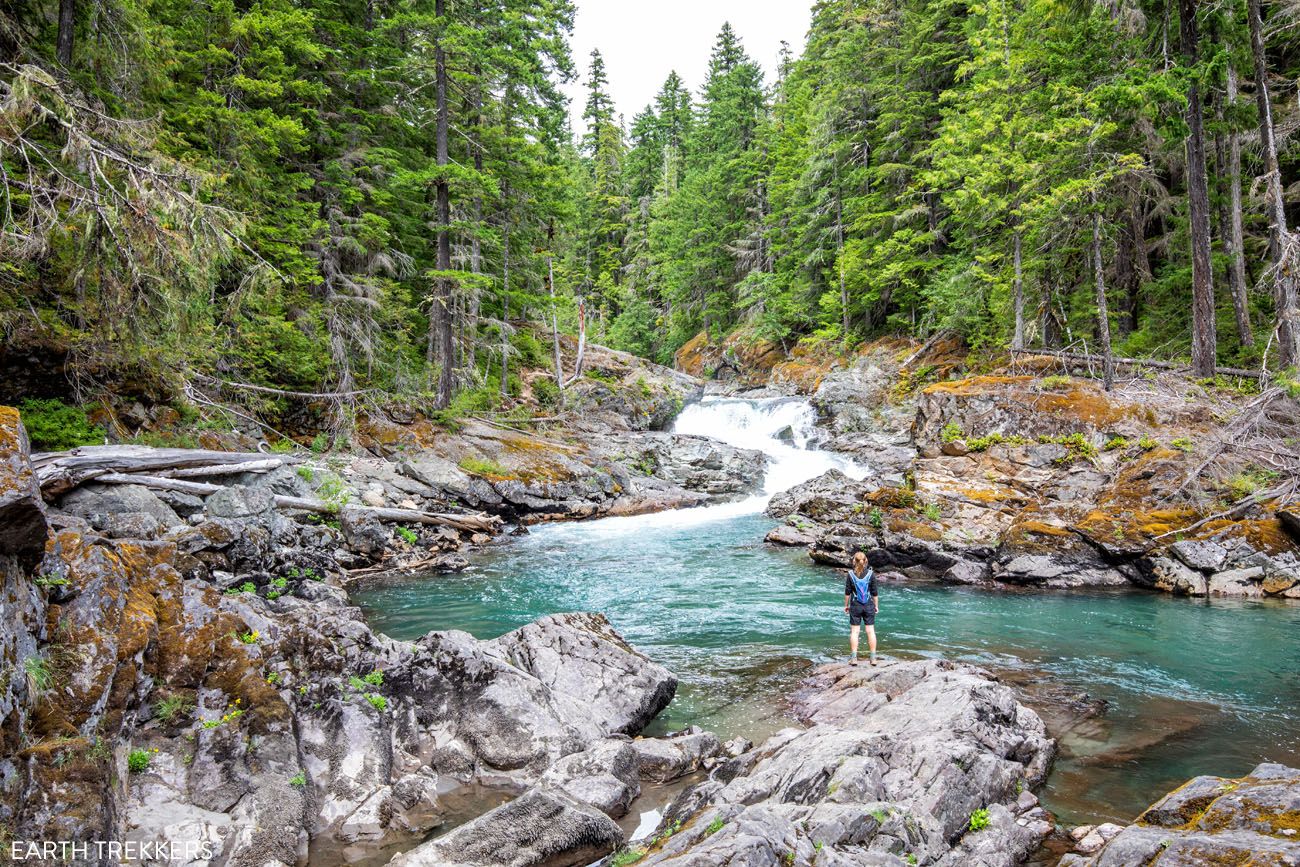
Ohanapecosh River
This short, easy trail is perfect for all ages and ability levels. Less than 4 miles in length, with just a small amount of elevation gain, it’s a great hike for families and people of all ages.
This hike beat all of our expectations. For the entire hike, you are in an old growth forest. The trail weaves between the old, giant trees but the highlight is the view of Silver Falls. From various overlooks and bridges, you are treated to views of the waterfall and the moss-covered rocks along the river’s edge.
PRO TRAVEL TIP: This is one of the best hikes in Mount Rainier National Park if you are here on a cloudy or rainy day.
We liked this hike so much that we wrote a detailed trail guide ↓
How to Hike the Silver Falls Loop Trail
Exactly how to hike the Silver Falls Loop Trail.Hikes in Carbon River
Carbon River is located in the northwestern quadrant of Mount Rainier National Park. It is more remote than the other sections, so if you like the idea of hiking a quieter trail, it’s worth the extra time to get here.
Both of the hikes listed below are located on Mountain Meadows Road. This is a 17-mile gravel road that is rough in some spots. However, you do not need a 4×4 for this road. It is suitable for standard cars. This road opens in June or July, depending on snowfall, and then closes in October or November.
IMPORTANT!!: There is a permanent closure if the SR165/Fairfax Bridge, so there is no public access to Carbon River and Mowich Lake. The bridge is closed to pedestrians, bicycles, and all vehicles.
The area is still open to backpackers (overnight wilderness permits are required) via the Wonderland Trail.
Spray Park: The Perfect Wildflower Hike
Distance: 8 miles
Difficulty: Strenuous
Total Ascent: 1,800 feet
Time: 4 to 6 hours
Trailhead: The end of Mountain Meadows Road
Best for: Hikers who want wildflowers, big views, and fewer crowds
Why it’s worth it: Expansive alpine meadows with Mount Rainier rising dramatically above them
Skip it if: You don’t want to drive a long gravel road or prefer shorter hikes
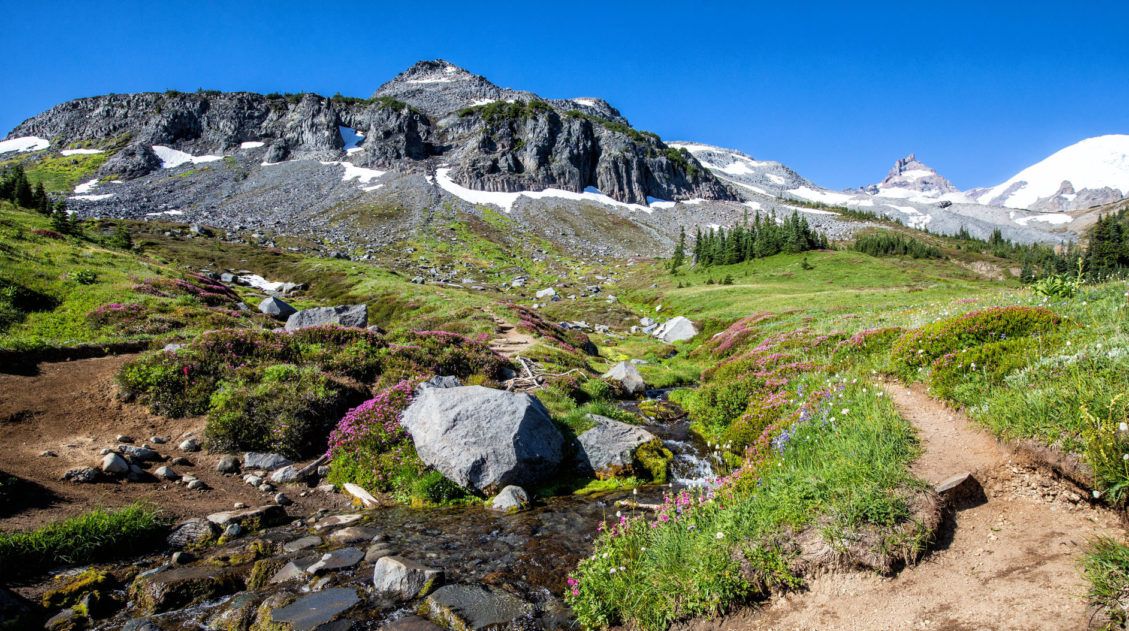
This is one of the best hikes in Mount Rainier if you want to see wildflowers and it feels more remote than Paradise or Sunrise.
The hike starts out in forest. Beyond the spur trail to Spray Falls, it is a tough climb. Once at the top, you leave many of the trees behind and begin your walk through fields of wildflowers. To make the experience even better, you get stunning views of Observation Rock, Echo Rock, and Mount Rainier.
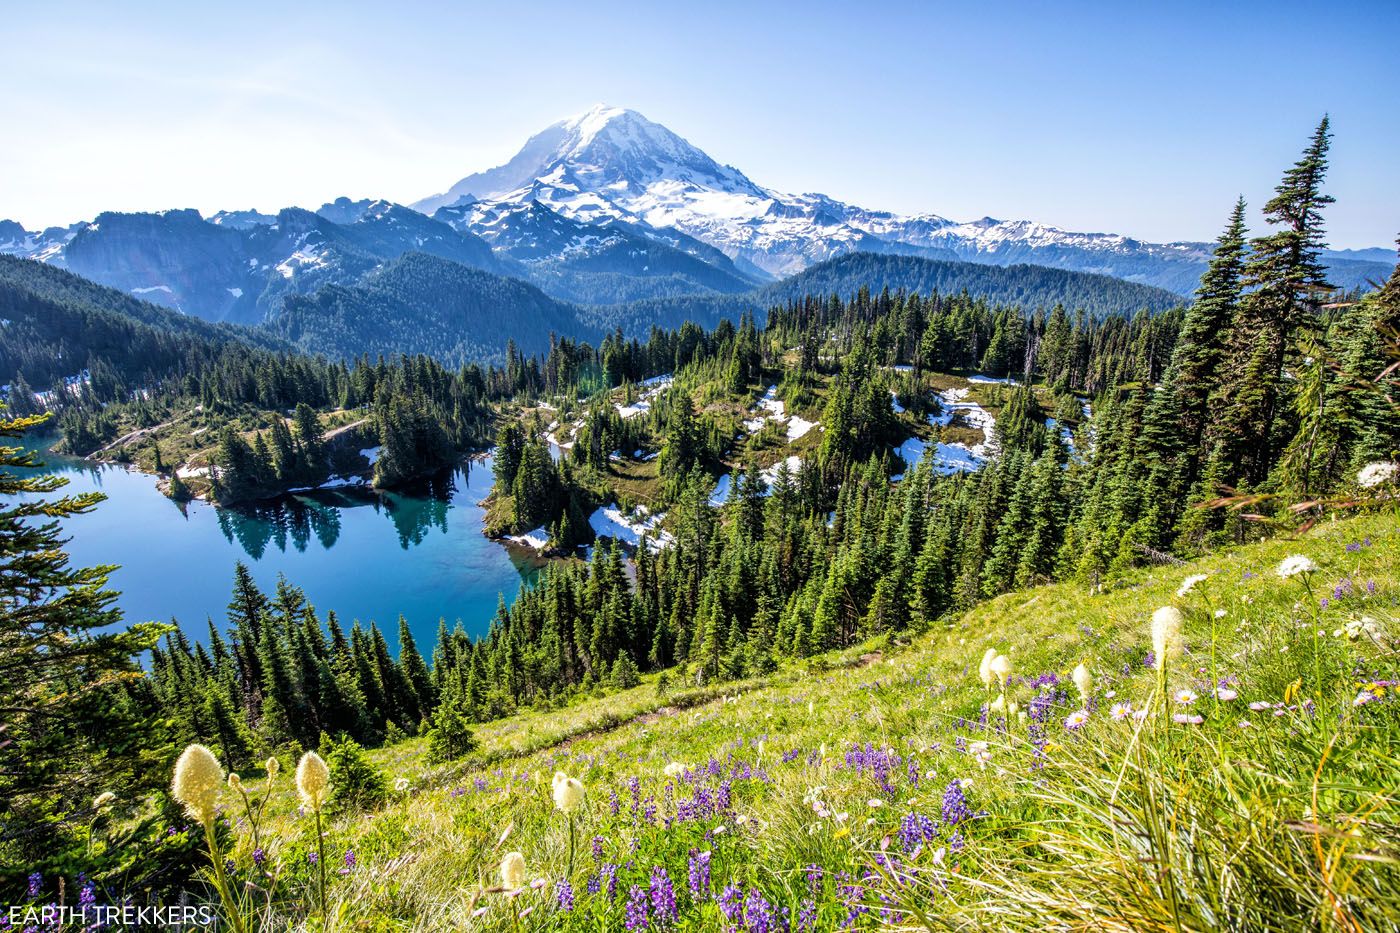
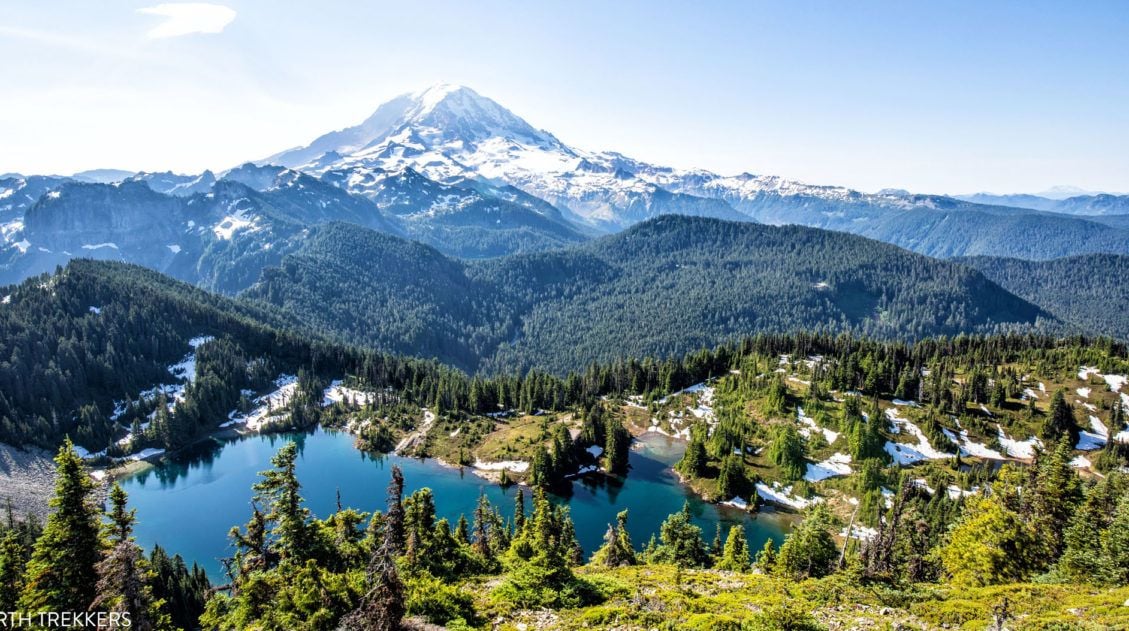
Tolmie Peak Fire Lookout: Our Favorite View of Mount Rainier
Distance: 5.6 miles
Difficulty: Moderate to strenuous
Total Ascent: 1,600 feet
Time: 2.5 to 4 hours
Trailhead: Tolmie Peak Trailhead is located on Mountain Meadows Road.
Best for: Hikers who want big views with fewer crowds
Why it’s worth it: A historic fire lookout overlooking an alpine lake with Mount Rainier towering behind it
Skip it if: You prefer short, easy hikes or want quick access from Paradise
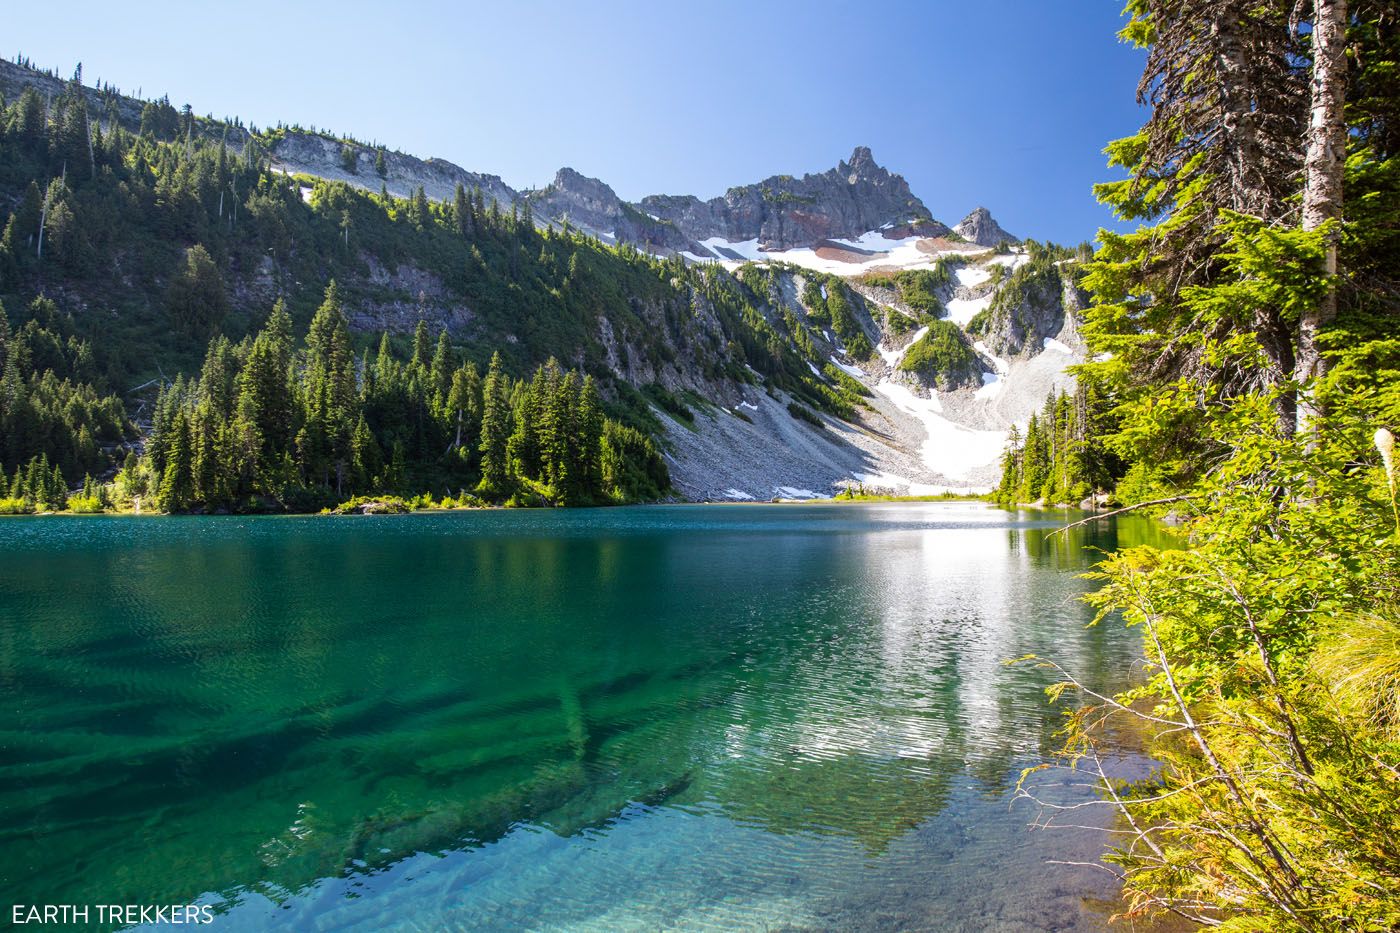
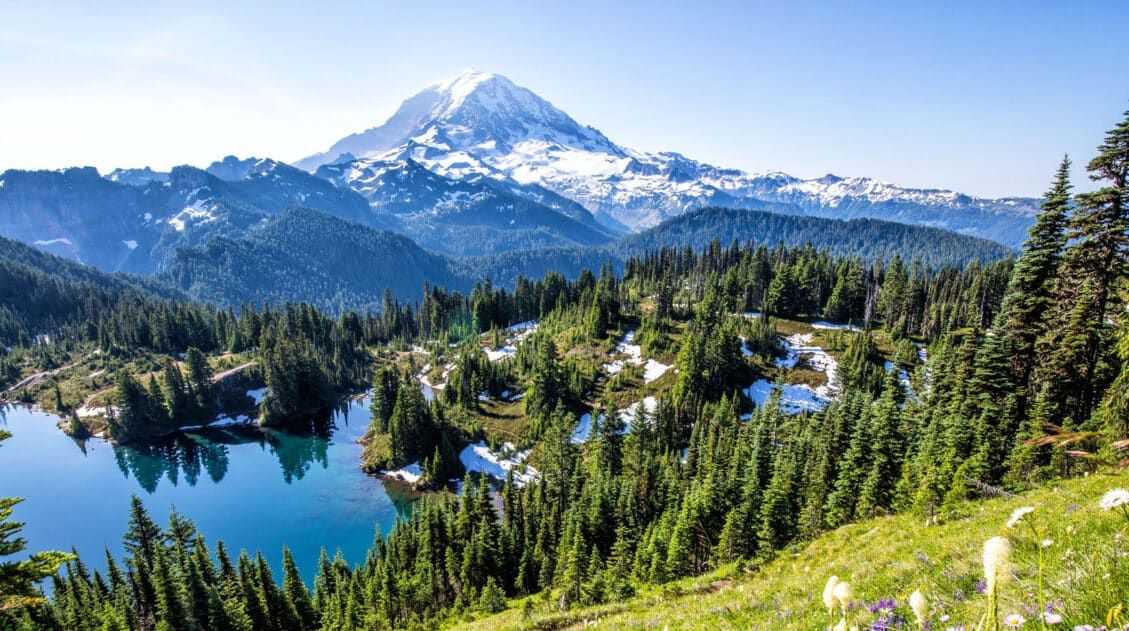
Tolmie Peak is one of our favorite hikes in Mount Rainier National Park. It combines forest hiking, alpine lakes, and dramatic views of Mount Rainier from a fire lookout for an all-around unforgettable experience.
The trail begins with a gradual climb through dense forest before reaching Eunice Lake, a beautiful alpine lake that reflects Mount Rainier on calm days. From here, the final ascent climbs steadily to the Tolmie Peak Fire Lookout.
At the top, you’re treated to one of the most classic views in the park: the fire lookout perched above Eunice Lake with Mount Rainier dominating the background.
If you’re debating between Tolmie Peak and Spray Park, Tolmie offers a clear summit payoff. Spray Park emphasizes meadow scenery and wildflowers.
For a detailed, step-by-step breakdown of the route, see our full Tolmie Peak Trail guide.
The Wonderland Trail
Distance: 93 miles
Difficulty: Strenuous
Total Ascent: Over 23,000 feet
Time: 9 to 13 days
Best for: Experienced backpackers looking for one of the premier multi-day hikes in the United States
Why it’s worth it: A complete circumnavigation of Mount Rainier through nearly every ecosystem in the park
Skip it if: You’re visiting for just a few days or not prepared for backcountry travel
The Wonderland Trail is a 93-mile trail that circumnavigates around Mount Rainier. Not only is this one of the best experiences in the park, hiking the Wonderland Trail is one of the top backpacking trips in the USA.
Along the hike, you will cross rivers and streams, walk through canyons and temperate forests, and get to see Mount Rainier from all angles. It’s an unforgettable experience, if you have the time and the stamina.
Section Hiking the Wonderland Trail
If you don’t have time for the full circuit, consider hiking a section as a long day hike. Portions of Skyline, Summerland, Spray Park, and other trails overlap with the Wonderland, giving you a taste of the route without the full commitment.
To do this, you must have a permit, and these are in high demand. If this sounds like something you would like to do, you can learn more here.

When Can You Go Hiking in Mount Rainier National Park?
There is a narrow window of time that you can do most of these hikes in Mount Rainier National Park.
The hiking season typically starts in late June or early July and ends in October. Outside of this time range, not only are the hiking trails covered in snow, but many of the park roads are closed.
Here is a general timeline for road closures and openings in Mount Rainier National Park:
- Stevens Canyon Road: open during the summer and early fall
- Sunrise Road: opens in late June or early July and closes in late September or early October
- Chinook Pass and Cayuse Pass: Chinook Pass and Cayuse Pass are generally open from Memorial Day through mid-November, depending on snowfall
VERDICT: If you are planning to hike the trails at Mount Rainier, plan your visit from early July through late September.
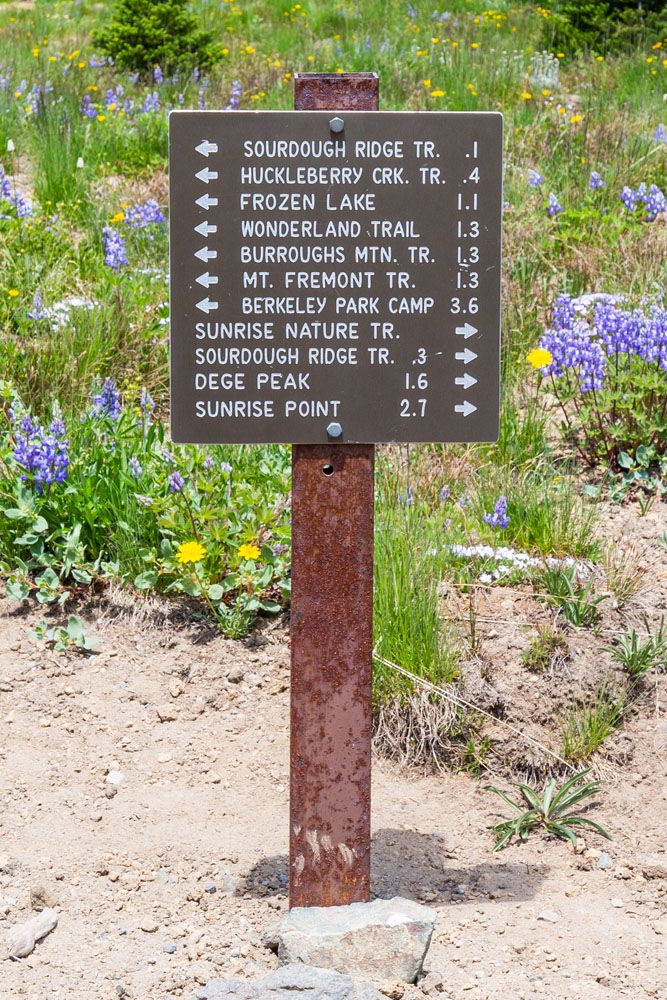
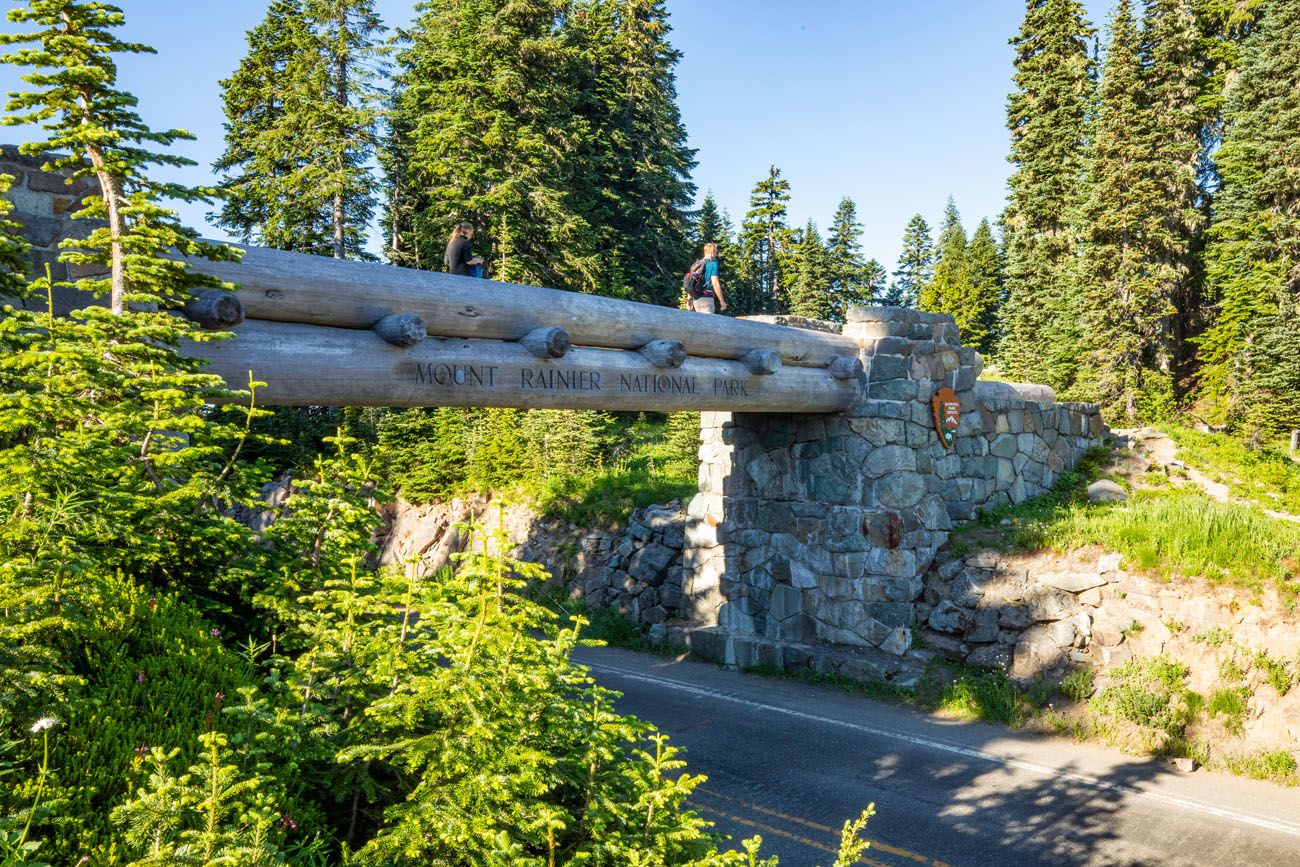
All of the hiking trails are marked with signs like this one.
4 Common Mistakes First-Timers Make in Mount Rainier
Mount Rainier looks compact on a map, but planning your hiking days here requires more strategy than many first-time visitors expect. These are the most common mistakes we see, and how to avoid them.
1. Trying to Visit Paradise and Sunrise in One Short Day
Paradise and Sunrise are on opposite sides of the mountain. Driving between them can take 1.5 to 2+ hours, depending on traffic and road conditions.
Instead of rushing between both areas, dedicate a full day to each. You’ll spend more time hiking and less time in the car.
2. Underestimating Snow Conditions
Even in July, snowfields often linger on higher elevation trails like Skyline, Burroughs, Summerland, and Camp Muir.
Trails may be marked, but snow can obscure the path and make navigation less obvious. Hiking poles and proper footwear make a big difference.
If you’re visiting early in the season, check current trail conditions before committing to longer hikes.
3. Arriving at Paradise Too Late
Paradise is the most popular area of Mount Rainier National Park. Parking lots often fill by mid-morning on summer weekends.
If you plan to hike Skyline or Myrtle Falls, arrive early, ideally before 8:00 am during peak season.
4. Not Checking Road Opening Dates
Access to Sunrise and Carbon River depends on snowpack and road conditions. Sunrise Road typically opens later than Paradise.
Before your visit, check current road status on the National Park Service website to avoid itinerary disruptions.
Plan Your Mount Rainier Trip
If hiking is just one part of your visit to Mount Rainier National Park, these guides will help you plan the rest of your trip.
- Mount Rainier National Park Travel Guide – When to visit, where to stay, road openings, and seasonal tips
- Mount Rainier Itinerary (1 to 3 Days) – How to structure your time in Paradise and Sunrise
- Best Things to Do in Mount Rainier – Scenic drives, viewpoints, and non-hiking highlights
Mount Rainier is one of our favorite parks for hiking, but it’s not the only one. See how these trails compare in our guide to the Best Hikes in the US National Parks, featuring standout hikes from 55+ parks across the country.
If you are planning a bigger trip across Washington, we have lots of helpful information our Olympic National Park Travel Guide and North Cascades National Park Travel Guide.
If you have any questions about the best hikes in Mount Rainier National Park, or if you want to share your favorite hike, let us know in the comment section below.
More Information for Your Trip to Washington
If this is part of a bigger road trip through the USA, visit our United States Travel Guide and our Washington Travel Guide for more inspiration and travel planning tips.
Best Things to Do in Mount Rainier National Park (2026 Guide)
Pinterest Facebook Flipboard Discover the best things to do in Mount Rainier National Park, from iconic hikes like the Skyline Trail and Mount Fremont Fire Lookout to scenic viewpoints, waterfalls, and easy walks that are perfect for first-time visitors. We’ve visited Mount Rainier National Park twice: once on a 6-day deep dive where we hiked […]

Hiking the Enchantments in One Day: A Step-By-Step Trail Guide
Over 19.25 miles, climb Aasgard Pass, wander through a surreal landscape of turquoise alpine lakes and jagged peaks, then descend nearly 7,000 feet to the Snow Lakes trailhead. Hiking the Enchantments in one day is a long, hard challenge, but one you’ll never forget. If you are a hiker, the Enchantments are a destination that […]
Essential Hiking Gear: What Should You Bring on a Day Hike?
In this post, find out what we carry with us on day hikes. Whether you are a new hiker, shopping for a friend or family member, or just curious about what hiking gear you should bring on a day hike, we have a lot of great information to share with you. We have hiked thousands […]
Washington Road Trip Itinerary: Olympic, Rainier & North Cascades (7–14 Days)
Washington state is one of the great road trip destinations in the United States, and this itinerary is the one we wish we’d had before our own trip. We spent several weeks exploring Washington’s three national parks—Olympic, Mount Rainier, and North Cascades—as well as Leavenworth, Lake Chelan, and the Enchantments. We then combined our top […]
Mount Rainier National Park Travel Guide: How to Plan Your Visit
Mount Rainier National Park Mount Rainier National Park is an outstanding park to visit, whether you are an avid hiker, a family on a road trip through the USA, or someone who simply enjoys exploring the natural wonders of this beautiful country. Mount Rainier is a glacier-capped, active volcano that can be seen for hundreds […]
Cascade Pass and Sahale Arm: The Best Day Hike in North Cascades
We’ve hiked in more than 50 national parks across the United States, and the Cascade Pass and Sahale Arm hike is one that still stands out. We did this hike as part of a six-week road trip through the national parks of Colorado and Washington, and it was the perfect way to end the trip. […]
Our 15 Favorite US National Parks: A Few May Surprise You
Stretching from the South Pacific, across the United States and into the Caribbean, are 63 national parks. These national treasures are filled with scenic drives, hundreds of miles of hiking trails, wildlife, historic sites, and endless opportunities for adventure. In this guide, we cover 15 of the best national parks in the USA and what […]
Best Hikes in Olympic National Park: Ranked by Area and Difficulty
Olympic National Park offers some of the most diverse hiking in the United States. Where else can you hike through a moss-covered temperate rainforest in the morning, walk along a wild Pacific coastline in the afternoon, and look out over glacier-capped mountain peaks from an alpine ridge? We spent four days in Olympic National Park, […]
12 Best Hikes in North Cascades National Park (Ranked by Difficulty & Area)
North Cascades National Park is not a place that easily reveals itself. Sure, the drive along Highway 20 is lovely. And the viewpoints over the lakes and mountain passes are gorgeous. But to really see this park, you are going to have to invest some time on the hiking trails. We spent three weeks hiking […]
The Ultimate Guide to the 63 US National Parks
Stretching from the South Pacific, across the United States to the Caribbean, are 63 national parks. These national treasures preserve iconic landscapes, majestic mountains, primordial forests, arid deserts, misty coastlines, immense canyons, wildlife, and historic landmarks. We have visited 56 of the 63 US national parks, from the towering granite walls of Yosemite and the […]
20 Fun, Short Hikes in the US National Parks
One of the best ways to experience the national parks is from a hiking trail. Hike to amazing viewpoints, deep into the forests, through scenic canyons, and to hidden lakes and waterfalls. Along the way, you have a better chance of spotting wildlife and potentially leaving the crowds behind. Here are 20 fun, short hikes […]
Ultimate Hiking Guide: Europe, Asia, Africa, Americas & Oceania
Are you looking for the perfect hike? With hikes on six continents ranging from a few miles to multi-day adventures, explore some of the best hikes from around the world.
Comments 22